The next time you're cleaning and waxing your boat, take the time to look for small cracks, scratches and chips in its gel coat. If your boat is more than a few years old, you'll probably be surprised at the number you find. We'll guide you through the process of repairing them.
- Skill Level Description
- Tools and Materials You Need to Repair Gelcoat
- Diagnosing Gelcoat Damage
- Repairing Gelcoat Damage
- Glossary of Terms
- FAQ
Skill Level Description (10=most difficult, 1=easiest)
Gelcoat work covers a wide range of difficulty, from a Saturday-afternoon buffing job to color-matched repairs that take real patience to get right. Knowing where your project falls on this scale before you start helps you set realistic expectations, budget the right amount of time, and decide whether a job is a confident DIY project or one better handed to a professional.
Buffing Out an Oxidized Boat: 2
This is the most forgiving gelcoat task on the list. Oxidation is a surface-level fading caused by UV exposure, and restoring it with a power buffer and rubbing or finishing compound doesn't require any color matching, mixing, or curing — you're simply cutting through the chalky top layer to reveal the color underneath. The main skills involved are keeping the buffer moving to avoid burning through the gelcoat in one spot and working in manageable sections so the compound doesn't dry out before you can buff it off. Most boat owners can complete this in an afternoon with a single pass of compound followed by a finishing pass, and the risk of a mistake that's difficult to undo is low.
Wet Sanding Scratches, Then Buffing: 4
This step up in difficulty introduces sandpaper directly to the gelcoat surface, which raises the stakes if you sand unevenly or go through a high spot too aggressively. Wet sanding smooths out scratches that compound alone can't remove, progressing through grits from coarse to fine before buffing. The skill here is mostly about control: sanding flat and even, checking your progress frequently, and resisting the urge to rush through the grits. Done correctly, this restores a smooth, glass-like surface without removing more gelcoat than necessary — gelcoat is a thin layer, and sanding through it down to the underlying fiberglass laminate is a real risk if you're not paying attention.
Filling Gelcoat Scratches on a White Boat: 4
Repairing actual scratches and chips — not just surface oxidation — introduces the full repair process: gouging out the damage, cleaning with acetone, mixing gelcoat paste, applying it, sealing it from air to cure, then sanding and polishing. On a white boat, this task stays at a moderate difficulty because color matching is comparatively forgiving. White gelcoat paste mixed straight from the kit, without the need to dial in a custom tint, will get you very close to the original color in most cases. The technical steps (gouging, filling, sealing, sanding) are the same regardless of color, which is why this sits above simple buffing but below colored repairs.
Filling Gelcoat on a Colored Boat: 6
This is the most demanding task on the list, and the added difficulty comes almost entirely from color matching rather than the mechanical repair steps themselves. Colored gelcoat fades and shifts tone differently than white over years of UV exposure, so matching a repair to surrounding gelcoat that has aged for a decade requires mixing multiple small test batches, letting each one fully cure (since gelcoat changes color as it cures), and comparing them against the existing surface in natural light before committing to a final batch. Even experienced boat owners rarely get an exact match on the first attempt, and deep or unusual colors (navy, forest green, burgundy) are typically harder to match than mid-tone colors. Budget significantly more time for this task than for a white-boat repair — the actual application takes the same few minutes, but the color-matching trial and error can take several attempts spread across a day or two of curing time between batches.
Tools and Materials You Need to Repair Gelcoat
- Sanding Block
- Wet/dry sandpaper sheets, from 220 to 600 grit
- Right Angle Power Buffer
- Bucket, water, boat soap
- Goggles
- Gelcoat
- Rubbing Compound, Finishing Compound, Wax or One-Part Cleaner Wax
- Sandpaper
- Resin Tools
- Application Brushes
- Plastic Spreaders
- Epoxy Syringes
- Reusable Mixing Sticks
Diagnosing Gelcoat Damage
Most scratches and chips in gelcoat result from impacts with hard objects (winch handles, downrigger weights, 15-pound lobsters) and are not cause for concern. But if you find a series of cracks, take a minute to inspect the area more closely. If the cracks radiate from the base of load-bearing equipment like a cleat or stanchion, there is probably a problem with the installation that deserves attention before repairing the gelcoat. Solving it might be as simple as shifting a load from undersized equipment, or installing a larger backing plate to spread the load over a wider area.
When a Crack Might Mean a Structural Problem
If cracks appear at important joints or intersections in the cabin or deck — rather than scattered surface dings from impacts — they can be a sign of an underlying structural weakness rather than ordinary cosmetic wear. This is different from the cracks discussed above that simply need a bigger backing plate. Cracking at a structural joint can indicate flexing, delamination, or a failing bond beneath the gelcoat that cosmetic repair will only mask, not fix. If you see this pattern, stop before repairing the surface and have a marine surveyor or qualified boat maintenance professional inspect the area first. Filling a structural crack without addressing the underlying cause typically means the crack returns, often worse, within one to two seasons.
Step-by-Step Guide to Repairing Minor Gelcoat Damage
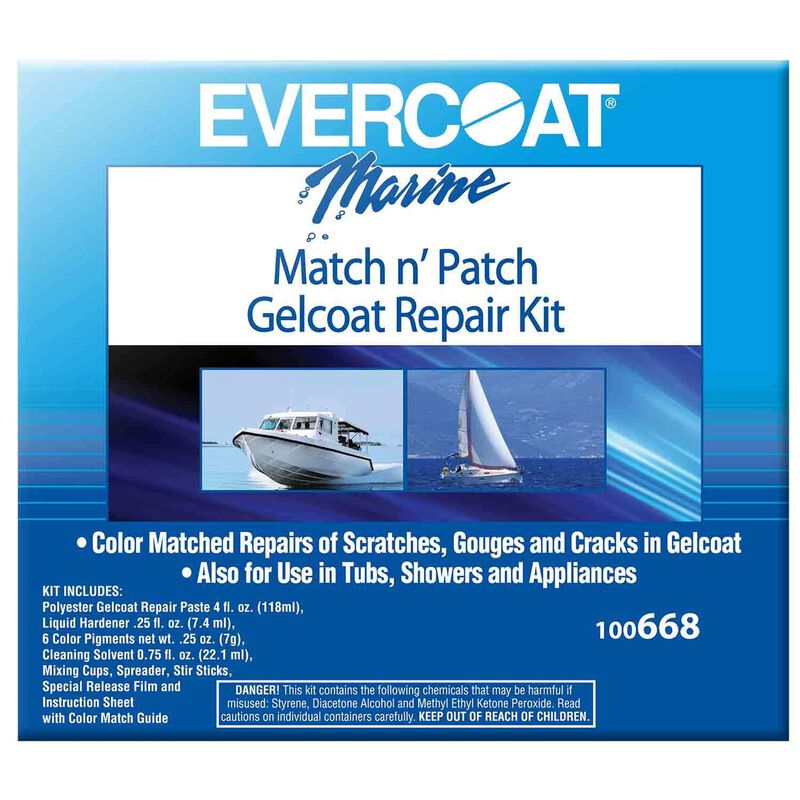
A gelcoat repair kit like this one has everything you need for color matching and making minor repairs to dings and chips in your gelcoat.
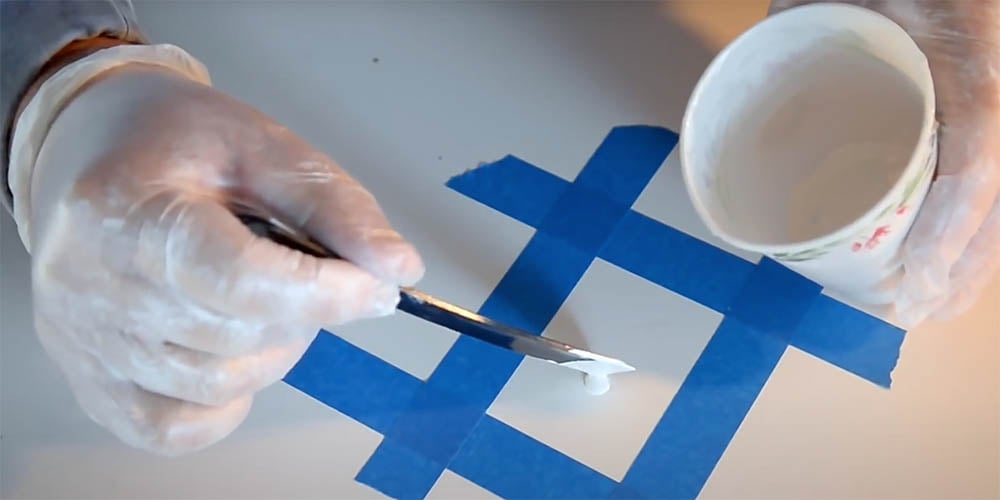
Step 1: Wash the repair area with soap and water, rinse it thoroughly, and allow it to dry completely. If the surface is oxidized, restore it with a rubbing compound; this is important because you’ll want the original surface color visible to accurately match your gelcoat paste. Once the surface is clean and dry, mark off the repair area with masking tape.
Step 2: Gouge out small, narrow cracks—along with any scratches too deep to remove with rubbing compound—until they are wide enough to accept gelcoat paste. A miniature grinding tool like a Dremel works best, but the sharp point of a can opener can be used in a pinch. If you don’t open up the crack, you won’t be able to force gelcoat into the repair area or expose enough surface to ensure proper adhesion. After shaping the crack, sand the area lightly using 220-grit sandpaper.
Step 3: Thoroughly clean the sanded area with acetone to remove sanding residue, waxes, and any other contaminants that could interfere with the bond between the existing surface and the new gelcoat. Provide adequate ventilation and wear appropriate protection for your skin and eyes whenever you work with acetone.
Step 4: Match the color of the existing gelcoat. Start with a white or neutral gelcoat paste (not resin) and add tiny amounts of coloring agent. Mix several small test batches with pigment, add hardener, and allow each batch to cure—gelcoat changes color during the curing process. Once you’ve found a satisfactory match (an exact match is nearly impossible), mix your final batch using the same pigment-to-paste ratio.
Step 5: Using a putty knife, apply the mixed gelcoat paste to the cracks or damaged areas. Be sure to force out any air holes and overfill slightly, as gelcoat tends to shrink while curing. When finished, seal the repair from exposure to air using a PVA curing agent, or by covering the area with plastic wrap or wax paper. Gelcoat does not cure properly when exposed to air.
Step 6: After the gelcoat has fully cured, sand the repaired area smooth. Wet sanding is especially effective with gelcoat. Begin with 220-grit sandpaper and progress to at least 400- or 600-grit for a slick, near-factory surface.
Step 7: Apply a coat of high-quality marine polish to restore shine and blend the repaired area with the surrounding surface—your gelcoat repair is now complete.
Glossary of Terms
Backing Plate: A rigid plate, usually aluminum, G10, or plywood, installed on the underside of a deck or hull beneath load-bearing hardware such as cleats or stanchions to spread the load over a wider area and prevent cracking around the fastener.
Delamination: The separation of bonded layers within a fiberglass laminate, often invisible from the surface but sometimes signaled by cracking, soft spots, or flexing in the affected area.
Finishing Compound: A fine abrasive product used after rubbing compound to remove light swirl marks and restore a high-gloss finish, typically the step before waxing.
Gelcoat: The pigmented outer resin layer applied to a fiberglass hull or deck during manufacturing that provides color, gloss, and a protective barrier against UV exposure and water intrusion.
Hardener: A catalyst mixed into gelcoat or resin immediately before application that triggers the chemical curing reaction, causing the material to harden.
PVA Curing Agent: Polyvinyl alcohol, a liquid film-forming agent applied over fresh gelcoat to seal it from air exposure during curing, since gelcoat will not cure properly, or will remain tacky, if exposed directly to air.
Rubbing Compound: A moderately abrasive paste used to remove oxidation and restore a faded gelcoat surface before color-matching or after a repair has been sanded smooth.
Wet Sanding: A sanding technique using water as a lubricant to reduce friction and heat buildup, producing a smoother finish than dry sanding and commonly used on gelcoat repairs progressing from coarse to fine grit.
Frequently Asked Questions
Yes, for minor scratches, chips, and surface cracks, gelcoat repair is a manageable DIY project using a repair kit, basic hand tools, and patience while waiting for test batches to cure. Structural cracks at joints or intersections, however, should be evaluated by a marine surveyor or qualified professional before any cosmetic repair is attempted.
Gelcoat changes color slightly as it cures, so a test batch that looks like a perfect match while wet may look different once hardened. The original gelcoat has also faded and oxidized unevenly over years of UV exposure, making a truly exact match nearly impossible. Mixing and curing several small test batches before committing to a final batch is the most reliable way to get as close as possible.
Gelcoat is a pigmented resin specifically formulated to be the visible, finished outer surface of a fiberglass boat, providing color and UV protection. Plain resin is unpigmented and is used to bond fiberglass cloth or build up structural layers beneath the surface, not as a cosmetic finish. Gelcoat repair kits use gelcoat paste, not standard resin, so the repaired area matches the surrounding finish.
A crack that returns after repair is usually a sign that the underlying cause was never addressed. Cracks radiating from hardware like a cleat or stanchion often mean the load isn't adequately supported and may need a larger backing plate. Cracks at structural joints or intersections can indicate flexing or delamination beneath the surface, which cosmetic gelcoat repair cannot fix on its own — the structural issue needs to be resolved first.
Gelcoat does not cure properly when exposed to air. If the repair was not sealed with a PVA curing agent, plastic wrap, or wax paper while curing, the surface can remain soft or tacky indefinitely. If this happens, clean the surface with acetone, reapply a thin layer of gelcoat, and seal it properly from air exposure this time before allowing it to cure.
We’re Here to Help!
West Marine carries gelcoat repair kits, sanding supplies, power buffers, and rubbing and finishing compounds for every step of a gelcoat repair, from minor scratches to color-matched paste repairs. Click on our handy store locator to find a West Marine store near you.
Related: