Roller furling allows you to spend less time folding or changing sails and more time on the water. Furlers have become a reliable, easy-to-install industry standard found on performance racing boats and cruisers alike. This guide gives you an idea of what to expect when installing a new unit, regardless of brand.
Components
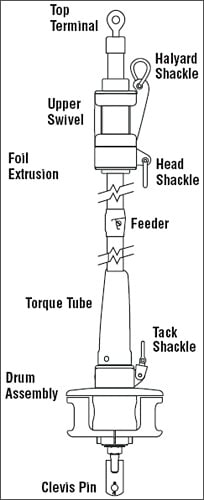
A roller furling system consists of foil extrusions, a feeder, an upper swivel (on most but not all systems), a lower drum assembly, and a furling line. Most manufacturers include all components needed for installation, but you may need to purchase furling line, line hardware, and a headstay terminal separately. Some units require cutting the headstay; others work with your existing stay without modification. You may also need a halyard restrainer to prevent the halyard from wrapping around the forestay, and possibly a toggle or link plate at the base to clear a windlass or bow pulpit. Order all necessary terminals or kits before starting.
Your sail may need modification to work with the new furler. You can convert an existing jib by having a qualified sailmaker install a luff wire or bolt rope, but you may be better served by a new headsail designed specifically for furling use — one that will hold its shape when fully or partially deployed. Discuss which furler you are buying and how you intend to use it with your sailmaker before purchasing.
Tools You’ll Need
- Wire cutters
- Needle nose pliers
- Screwdrivers: 1/8” and 1/4” flat and #2 Phillips
- Tape measure
- Large adjustable wrench
- Crescent wrenches
- Polysulfide marine sealant for Norseman® or Sta-Lok® fittings — do not use silicone sealant
- Hacksaw with a fresh blade
- File or sandpaper
- Paper towels and rags
- Vise grips
- Drill or rivet gun
- Bucket or container (to catch wire strands when cutting the headstay)
Installation
All systems include detailed instructions, but installation can be challenging for the first-timer. If you are not comfortable measuring, removing, and re-installing your headstay, hire a professional rigger. Many manufacturers require purchasing a terminal separately. A rigger with specialized equipment must install swage fittings, but Hi-Mod®, Norseman®, and Sta-Lok® terminals can be installed with hand tools and come with detailed instructions.
Headstay age: If your headstay is significantly worn or has been in service many years, replace it when you install the furler. Once a furling extrusion is in place over the wire, you cannot visually inspect the headstay for broken strands or internal corrosion — a failure becomes impossible to detect until it happens. A new headstay at installation time is inexpensive insurance. Consult your rigger for a recommendation based on your headstay’s actual condition and service history.
Sizing and measuring: Furler sizing is based on headstay length, maximum wire and clevis pin diameter, and turnbuckle size. Measure pin-to-pin with the turnbuckle at the correct working length before measuring. If using your existing stay, you may need to cut it to length. Follow the manufacturer’s guide to calculate how much wire to remove. Make a clean cut with wire cutters or a hacksaw with a fresh blade, holding the wire over a bucket to catch loose strands.
Assembly — top-down method (Harken and similar): Lay out all parts organized in order on a clean surface free from dirt, gravel, or sand. Slide the top foil cap and all extrusion connectors up onto the stay first, before the lower terminal is attached. Foil sections slide over the connectors and attach with a wedge, set screws, and Red Loctite (use Loctite only on the fasteners specified in the instructions — it is permanent and extremely difficult to remove). Before attaching the bottom extrusion, slide the top swivel onto the foil, attach the feeder, and slide the torque tube on. Install the terminal, attach the bottom foil, then assemble the drum.
Assembly — bottom-up method (other manufacturers): Disassemble the lower drum and slide the lower swivel and torque tube assembly over the stay down to the bottom. Slide the first extrusion on and attach the feeder. Slide each extrusion over the stay connecting sections with supplied joints, connectors, and fasteners. The top extrusion section may need to be cut to size. Slide on the upper swivel and confirm it runs smoothly over every extrusion connection — smooth travel here ensures the sail will hoist without binding. Add the top cap.
Raising the furler: With the terminal fitting installed, raise the furler using a halyard, a helper or two, and a bosun’s chair. Place the lower end of the system inside the lifelines, attach the unit to the chainplate, and lift using a halyard at the top. Make sure the upper swivel is resting at the bottom before lifting to prevent it from dropping under its own weight during the raise. Connect the upper clevis pin. Open the turnbuckle at the drum if needed to make reattachment to the chainplate easier.
Rigging the furling line: Furling line and hardware either come with the unit or are available as an optional kit. Lead the line aft to the cockpit through a series of blocks. The line should leave the drum perpendicular to the headstay — this minimizes chafe and reduces friction. Careful placement of the first block determines this angle. Once the line is led, hoist the sail and you are ready to furl.
Modern roller furling systems are more reliable and easier to install than ever. Installing it yourself saves money and, once done, makes sail handling a simple one-person job from the cockpit. Happy sailing.

Frequently Asked Questions
Do I need to replace my headstay when installing a roller furling system?
Not always, but seriously consider it. Once the furling extrusion is over the wire, you cannot inspect the headstay for corrosion, broken strands, or fatigue without removing the entire furler. A failed headstay brings down the mast. If your headstay is worn, corroded, or has significant service time on it, replacing it at installation is far less expensive than a dismasting. Have a rigger assess the wire’s condition and recommend accordingly.
Can I install a roller furler myself?
Yes, if you are comfortable working aloft and with basic rigging tasks. Most Harken and Schaefer furlers are designed for owner installation and include clear instructions. The most technically demanding parts are measuring and cutting the headstay accurately and installing the terminal fitting. Hi-Mod, Norseman, and Sta-Lok terminals can be installed with hand tools. If you are not confident about any of these steps, hire a rigger for those parts and do the rest yourself, or have the rigger handle the full installation.
What type of sealant should I use for terminal fittings?
Polysulfide marine sealant only. Do not use silicone sealant on Norseman, Sta-Lok, or Hi-Mod fittings. Silicone does not bond reliably to stainless steel under the compression loads in a terminal fitting, and any residue on the wire or cone prevents the fitting from making full metal-to-metal contact. Polysulfide provides the right combination of adhesion, flexibility, and water exclusion for this application.
Why does the furling line need to leave the drum perpendicular to the headstay?
If the furling line leaves the drum at an angle, it creates a sideways load on the drum that causes uneven wear on the furling line and accelerates chafe where the line contacts the lead block. A perpendicular exit distributes the load evenly, extends line life, and reduces the friction that makes large furlers hard to operate in heavy conditions. The placement of the first turning block controls this angle — take time to get it right before finalizing the lead.
What causes a roller furler to jam and how do I prevent it?
The most common causes are the halyard wrapping around the headstay/extrusion, the furling line fouling on the drum, and the extrusion connections binding if the foil sections are not properly aligned. A halyard restrainer prevents the first problem. Keep the furling line neatly wound on the drum with moderate tension and avoid letting it go completely slack. If the furler jams mid-furl, ease the sheet tension completely before attempting to resume furling — trying to force a jammed furler under load can damage the drum or extrusion.