
Ventilation is essential for the longevity of your boat's interior and the comfort of your crew. Stagnant, moist air can collect in your cabin and compartments, forming a breeding ground for mildew. Fabrics will rot, electronics will corrode and bubbles will form in your hull's gelcoat as moisture on the inside forces the exterior finish to delaminate. In other words, if you love your boat—ventilate! If your vents and hatches are deteriorating, replacing them with new ones will add protection for your boat's interior. Old, warped hatches with decayed trim rings don't seal well, allowing moisture in and heat out.
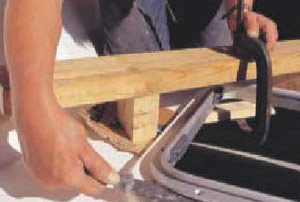
A homemade wood jig, a C-clamp, a blade and a few choice words... and you carefully pry the old hatch off.
Choosing a Location
- Keep structural issues in mind. Hatches and vents don't provide any stiffness. Be sure to pick a spot that won't compromise the deck's structural integrity.
- Make sure the installation surface is as flat as possible. Lewmar for example, only allows 1mm of crown for their hatches. If you can't find a flat spot, construct a build-up pad. You can even make it an attractive addition by choosing mahogany or teak instead of fiberglass, though that adds maintenance work in the long run.
- Make sure there's adequate room for the hatch to swing open without hitting hardware or other obstacles. Check your proposed cutout from both above and below deck by measuring from objects with known locations that pass through both sides, like hardware mounting bolts, an existing vent, or a mast. Lay out the outline of your cutout, both above and below. Extra care in the layout and measuring process now will prevent nasty surprises later, like accidentally sawing into a bulkhead.
- Be careful when you remove your old hatch-pulling out the old bedding compound too roughly can delaminate the deck. Use a combination of a thin blade, solvents, clamps, wedges and, perhaps, a few choice expletives to coax it out.
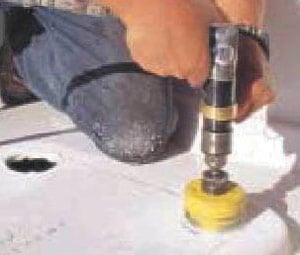
Making the cut: Use a hole saw for the radiused corners. Connect the circles with your jigsaw.
Cutting the Hole
- Use the right tools for the job: drill and hole saws or spade bits, jigsaw or Sawzall, compass (for marking radii), ruler, felt-tip marker, masking tape, screwdrivers Allen wrenches, hack saw, files or rasps.
- Use the right supplies: caulking gun and caulk or bedding compound, epoxy and the new hatch or vent with appropriate screws and fasteners.
- Follow the old adage: "Measure twice, cut once."
- Before you saw, be sure there are no wires, gas lines, rigging, plumbing or other kinds of interference in the area you plan to make your hole.
- Headliners will have to be removed to enable proper inspection of the underdeck area. Be careful not to damage the headliner material if you plan to reuse it. Cut the headliner from corner to corner of your cutout location, fold the triangles of material back, secure them with tape, and trim to the exact fit when the hatch is in place
- Templates are often provided with the hatch or vent. Tape the template down to the deck to trace the cutout outline.
- Take a deep breath, and make the cuts! For rectangular shapes, use an appropriately sized hole saw or spade bit to outline the radius of each corner, if possible, and connect the four corners by making straight cuts with a jig or saber saw. Make all your cuts just inside the outline to be on the safe side, and clean up the edges with a file and coarse sandpaper.
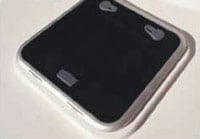
Finished product . . .Looks great!
Finishing the Cutout and Installing the Hardware
- Seal all exposed edges of the deck, with several coats of epoxy. If there is foam or balsa core material, chisel it back from the edge about half an inch. Prime it with epoxy. Mix a batch of epoxy with some colloidal silica or low-density filler to peanut butter thickness, and trowel it into the cavity. Sealing the deck and core thoroughly is crucial to prevent water intrusion from delaminating and damaging your deck's core.
- If you have leftover fastener holes from the old hatch or vent, fill them using a syringe filled with thickened epoxy, color matched to the deck if they will be exposed once the new hatch or vent is in place. Be sure to back the holes inside with cardboard or scrap wood covered with waxed paper to prevent drips from making a mess inside the cabin
- Drill the new fastener holes and dry-fit the hatch or vent before fitting it in place with caulk. (You want to make sure everything lines up and fits correctly.) Use masking tape to keep sealant and epoxy from getting on the deck, especially non-skid surfaces, where it's nearly impossible to remove. If any goo gets loose, wipe it up while it's still wet.
- Install the interior trim ring or screen kit to give the hatch a neat, finished appearance.
A vent in your deck allows the compartments belowdecks to breathe. Experts recommend that the air inside a boat be changed completely at least once per hour. Vents and hatches help prevent mildew and damage while underway as well as when moored or at anchor, so we definitely recommend having plenty of them. However, not all ventilation projects are the same. Be realistic about the job and your level of carpentry skill, after all, you're putting some sizable holes into your boat.
While most of us can install a simple low-profile ventilator on a horizontal surface, putting a new hatch or cowl ventilator into a cambered deck, or where there are additional complications such as wiring or plumbing, may be a job better left for a marine professional.