
Is an Epoxy System Right for Your Project?
If you are considering a boat repair or building project, your first decision concerns whether epoxy is the best product for your application, or if you should instead consider a polyester or vinylester resin, gelcoat repair product, or an adhesive sealant like 3M’s 5200 polyurethane caulk.
- What Projects Can You Use Epoxy For?
- Key Epoxy Applications
- Which Epoxy Should You Choose?
- Filler Terminology and Consistency
- Epoxy Curing Stages
- Epoxy Safety Precautions
- Online Epoxy Resources
- FAQs
What Projects Can You Use Epoxy For?
Epoxy resin, used in conjunction with its companion hardeners, fillers, fabrics, and tools, is one of the most versatile materials available for boat repair and construction thanks to the strong bonds it creates. Epoxy-based systems owe their broad acceptance, by pros and amateurs alike, to the fact that they allow you to tackle such a wide variety of projects. Whether you want to repair gelcoat cracks or a delaminating deck, install a bulkhead, or even cold-mold a brand-new hull, you can create an epoxy mixture with the precise characteristics you need.
We’ve found that doing repairs with epoxy products has added a whole new dimension to our boat maintenance skills. We feel empowered to take on projects that we would have formerly delegated to a boatyard or boat maintenance worker. Epoxy systems have many additional applications at home when it comes to reinforcing furniture, patching surfaces, and other repairs.
Key Epoxy Applications
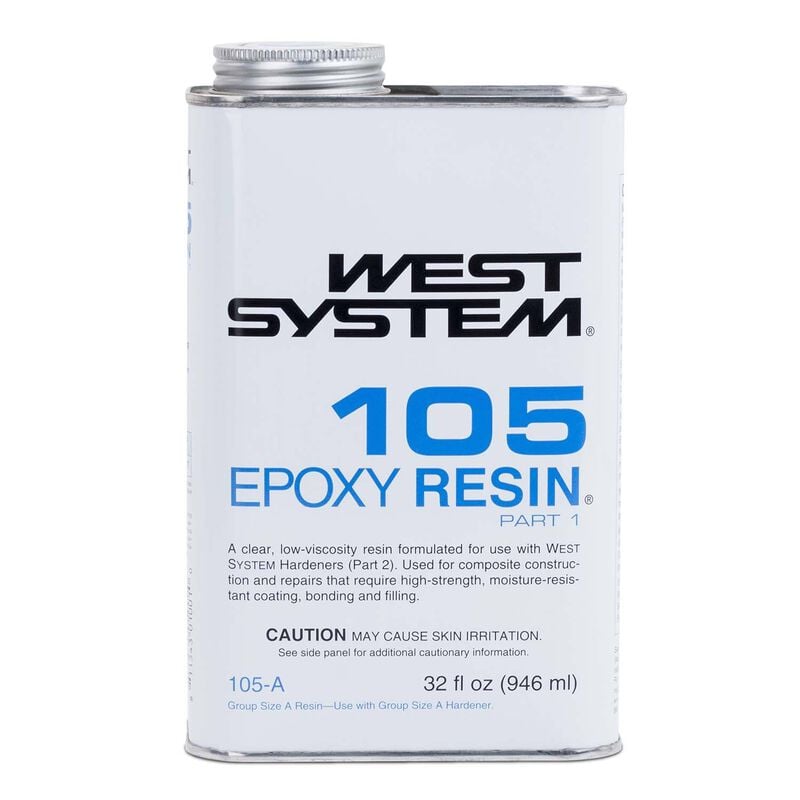
West System’s 105 epoxy resin is the heart of West System’s family of products and is used in a wide variety of boat building and repair projects.
Epoxy uses fall into a few core categories:
Coating
Applying one or more thin coats of epoxy to seal a surface or prepare it for varnish or reinforcing layers like fiberglass or carbon fiber.
Bonding
Applying epoxy as a glue — generally with some filler to fill gaps between surfaces — or to attach hardware to a surface.
Laminating
Multiple layers of wood or other materials are laid up to create a thicker solid structure.
Fairing
Thickened resin is used to fill holes and depressions so that the surface can be sanded and smoothed.
Note that while many applications involve wood, epoxy resin can be used on fiberglass, carbon fiber, and metals.
Which Epoxy System Should You Choose?
West System products have been around for over four decades, and the manufacturer provides some of the clearest technical information anywhere. We carry almost their entire product line in our stores, and many of our associates have lots of experience using West System products. Take your pick between West System and the Interlux Epiglass epoxy products. Used correctly, either will deliver great results as a boatbuilding and repair material. For this West Advisor, however, we’re going to discuss the readily-available West System. We’ll also note that West System and West Marine have no connection besides the fact that we use and market West System products (WEST stands for Wood Epoxy Saturation Technique, a wood-epoxy composite boatbuilding method used by company founders Meade and Jan Gougeon).
Follow these steps to get started using West System products:
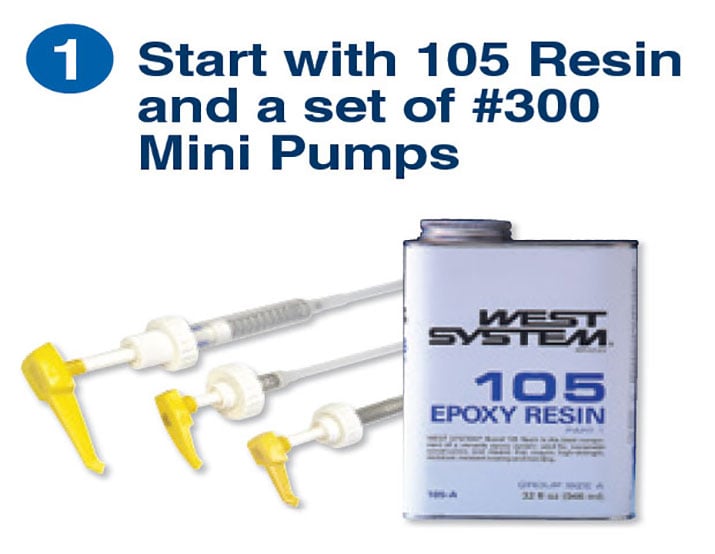
Start with 105 Epoxy Resin — the basic ingredient of all West System epoxy compounds. The clear amber resin cures to a high-strength plastic solid at room temperature when mixed with specific proportions of the correct hardener. Use Mini-Pumps for convenient and accurate metering — one full pump of resin to one full pump of hardener for the correct mixture.
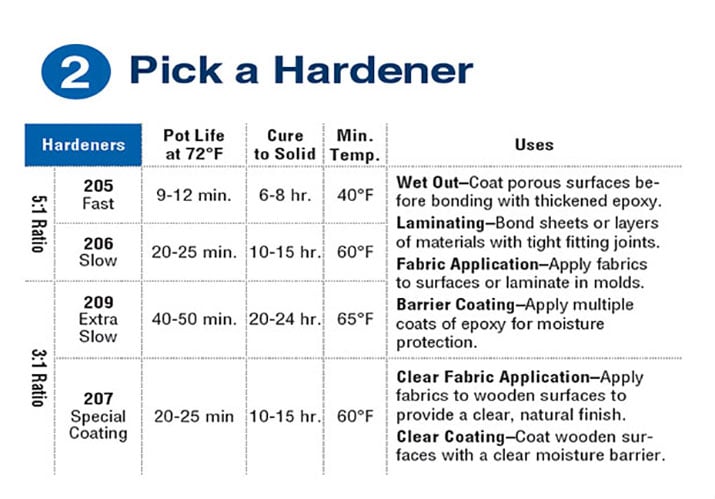
Mix with one of four West System hardeners. Select a hardener based on the intended use and the cure speed best suited for your job and working temperature. Resin and hardeners are packaged in matched Group Sizes (Group A, Group B, etc.) so you always have the right proportions.
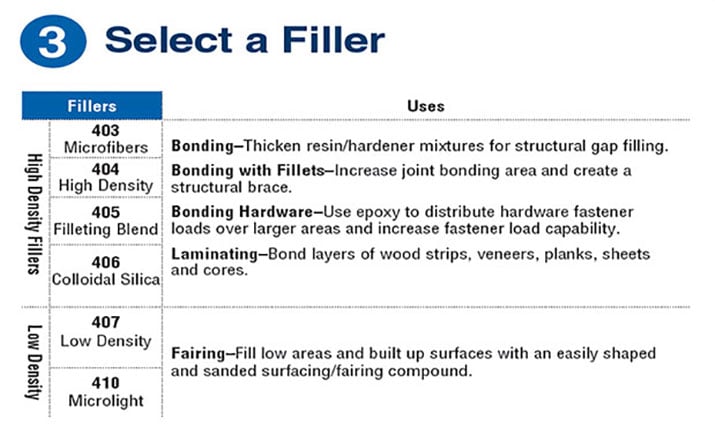
Add one of six West System fillers to thicken the mixture as needed, selected for handling characteristics or cured physical properties.
Low Density fairing fillers cure to a light, easily-sanded material often used for cosmetic or surface filling applications such as shaping or fairing. Examples include West System’s 410 and 407.
High Density adhesive fillers are used to modify the structural properties of the epoxy by adding strength, bulk, or both. They include West System’s 403, 404, 405, and 406. High density filler mixtures cure to a strong, hard-to-sand plastic useful in structural applications like bonding, filleting, and laminating.
Filler Terminology — Know Your Glop
West System fillers come in powdered form. They are mixed into the epoxy at different levels of consistency for doing different jobs. The thickness of a mixture is easily described using food-related terms. Always add fillers in a two-step process:
- Mix the desired quantity of resin and hardener thoroughly before adding fillers. Begin with a small batch — allow room for the filler.
- Blend in small handfuls or scoops of the appropriate filler until the desired consistency is reached.

Syrup
- Consistency: Unthickened mixture
- Characteristics: Drips off vertical surfaces
- Uses: Coating; wetting-out before bonding; applying fiberglass, graphite, and other fabrics

Ketchup
- Consistency: Slightly thickened
- Characteristics: Sags down vertical surfaces
- Uses: Laminating/bonding flat panels with large surface areas; injecting with a syringe

Mayonnaise
- Consistency: Moderately thickened
- Characteristics: Clings to vertical surfaces; peaks fall over
- Uses: General bonding, filleting, hardware bonding
Peanut Butter
- Consistency: Maximum thickness
- Characteristics: Clings to vertical surfaces; peaks stand up
- Uses: Gap filling, filleting, fairing, bonding uneven surfaces
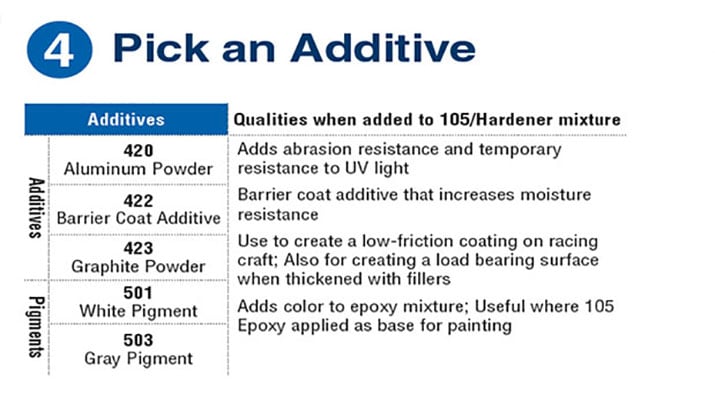
Additives alter the physical properties of the epoxy mixture in coating applications. Barrier coat additive (422) improves moisture penetration resistance. Graphite powder (423) makes coated surfaces slick — useful on rudders, centerboards, and trunks. White pigment (501) and gray pigment (503) add color, useful when 105 epoxy is applied as a base for painting. Unlike additives and fillers, reinforcing materials such as fiberglass or carbon fiber cloth are not mixed with the epoxy but are used in conjunction with it.
Click here to print or download a guide to West System’s epoxies, hardeners, fillers, and additives. ![]()
Understanding Epoxy’s Curing Stages
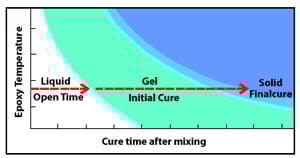
Mixing epoxy resin and hardener begins a chemical reaction that transforms the combined liquid ingredients to a solid. The time it takes for this transformation is the cure time. As it cures, the epoxy passes from the liquid state through a gel state before it reaches a solid state.
Liquid — Open time: Also known as working time or wet lay-up time. This is the portion of the cure time, after mixing, that the resin/hardener mixture remains liquid and workable. All assembly and clamping should take place during the open time to assure a dependable bond.
Gel — Initial cure: The mixture passes into an initial cure phase (also called the green stage) when it begins to gel or “kick off.” The epoxy is no longer workable and will progress from a tacky gel consistency to the firmness of hard rubber — you will be able to dent it with your thumbnail. Because the mixture is only partially cured, a new application of epoxy will still chemically link with it, so the surface may still be bonded to or recoated without special preparation. This ability diminishes as the mixture approaches final cure.
Solid — Final cure: The epoxy has cured to a solid state and can be dry sanded and shaped. You should not be able to dent it with your thumbnail. At this point the epoxy has reached about 90% of its ultimate strength, so clamps can be removed. It will continue to cure over the next several days at room temperature.
Epoxy Safety Precautions
Personal safety: Always wear disposable gloves and eye protection if any splashing might occur. Avoid breathing vapors. Use epoxy only in areas with good ventilation. Wear a respirator with an organic vapor cartridge. Wear a dust mask when sanding epoxy. If it has cured for less than a week, use a respirator with an organic vapor cartridge combined with a dust pre-filter.
Epoxy may cause skin irritation, especially with fair skin. Avoid all direct skin contact with resin, hardeners, and mixed epoxy by wearing gloves and appropriate clothing. If you get any epoxy on your skin, clean it off immediately with waterless soap, then wash thoroughly with soap and water. Never use solvents to remove epoxy from skin. Tools can be washed with white vinegar or isopropyl alcohol. Semi-gelled “green” epoxy can be removed with acetone. Avoid ingestion and wash thoroughly after each use, especially before eating or drinking.
Workshop safety: Clean up spills with a squeegee and paper towels, scraping up as much material as possible before using paper towels. Sand, clay, or other absorbent materials can be used to contain or soak up a spill. Clean residue with white vinegar or isopropyl alcohol. Always wear protective gloves when cleaning up spills.
Do not dispose of resin or hardener in liquid state. Before disposing of containers, puncture the corners and drain residue into clean containers for reuse. Small quantities of resin and hardener can be mixed and cured completely to a non-hazardous solid before disposal.
Epoxy is exothermic — it generates heat as it cures. Place pots of curing resin and hardener outside on the ground to avoid the risk of excessive heat and vapors. Dispose of after the reaction is complete and the mass has cooled. Follow your local, state, and federal regulations for proper disposal.
Online Epoxy Resources
- WEST System website
- West System epoxy how-to publications
Frequently Asked Questions
What is the difference between epoxy and polyester resin?
Epoxy forms a stronger, more waterproof bond than polyester resin and has much better adhesion to existing surfaces, which makes it preferable for repair work on fiberglass boats. Polyester resin is less expensive, is what most fiberglass boats are built with originally, and is the correct choice for adding fiberglass layers to an existing polyester laminate (epoxy over polyester is acceptable; polyester over epoxy is not — the polyester will not bond to cured epoxy). Vinylester resin falls between the two in cost and properties. For most marine repair and reinforcement applications, epoxy is the superior choice.
How do I know which hardener to choose?
West System hardeners are differentiated by cure speed, which is primarily determined by temperature. Slower hardeners (206, 209) give more working time in warm conditions or for complex assemblies that take time to position correctly. Faster hardeners (205) are appropriate for cold-weather work or when you want to move through multiple coats quickly. In hot conditions (above 80°F), use a slow hardener; in cool conditions (below 60°F), use a fast hardener. At any temperature, once the epoxy has gelled, it cannot be re-worked — start a fresh batch.
What is the green stage and why does it matter?
The green stage is the initial cure phase when the epoxy has gelled but not yet fully hardened. It matters because during this window you can apply additional coats or bonding layers without sanding — the new layer will chemically bond to the green epoxy. Once epoxy reaches final cure (solid, thumbnail-proof), subsequent coats require mechanical abrasion (sanding) to bond properly. Planning your project around the green stage can save significant sanding time and improve inter-coat bonding on multi-layer applications.
Can I use epoxy in cold weather?
Yes, but cure time increases significantly with lower temperatures, and below approximately 50°F, some epoxy systems may not cure properly at all. Use a fast hardener in cold conditions. In very cold conditions (below 50°F), warming the work area with a heat lamp or enclosing the work in a tent with a heater can allow the epoxy to cure correctly. Do not apply epoxy to surfaces below 40°F or when temperatures are falling. Cold epoxy also becomes more viscous and harder to mix and apply — warming the resin container in warm water before use improves workability.
How do I avoid fisheyes or contamination in epoxy coatings?
Fisheyes (small craters in the epoxy surface) are almost always caused by surface contamination — wax, oil, silicone, or mold release residue that repels the liquid epoxy. Before applying any epoxy coating, clean the surface thoroughly with a solvent such as acetone or isopropyl alcohol, wiping with clean dry rags in one direction rather than scrubbing back and forth. Never touch the prepared surface with bare hands — skin oil is sufficient to cause fisheyes. Apply the first coat as soon as possible after cleaning.