Stainless steel is an alloy containing at least 50% iron and 10% chromium, which inhibits corrosion. The more chromium, the more corrosion resistance — up to a maximum of about 30%. Many other elements are added to enhance the durability of a particular grade and type of stainless steel. Understanding these grades helps you make informed decisions about standing rigging, chainplates, turnbuckles, and other critical hardware.
- Type 302, 304, and 18-8
- Type 316: Extra Corrosion Resistance
- Passivation and How It Fails
- Sizing a Type 316 Rig
- Crevice Corrosion: A Real Example
- How to Prevent Crevice Corrosion
- Standing Rigging Inspection Checklist
- FAQs
Type 302, 304, and 18-8
Stainless steel alloys are grouped by crystal structure. Adding nickel creates austenitic stainless steels, identified by their 300-series designation, which are used throughout marine applications. Types 302 and 304 are widely used for rigging, fasteners, fittings, and propeller shafts. Type 302 is a general-purpose corrosion-resistant stainless with good strength. Most stainless produced today is Type 304, a low-carbon variation of 302, also called 18-8 because it contains 18% chromium and 8% nickel. There are many 304 sub-alloys for specific applications, providing adequate performance at an affordable price. However, 304 and other 300-series types are inadequate for some marine applications. Type 303, for example, contains sulfur or selenium for easy machining but has poor corrosion resistance in saltwater and should not be used in marine rigging applications.
Type 316: Extra Corrosion Resistance
Adding more nickel and 2–3% molybdenum to 304 produces Type 316, which has the best corrosion resistance among standard stainless steels. It resists pitting and attack by most chemicals, and is particularly resistant to saltwater corrosion. The trade-off is strength: Type 316 is only about 85% as strong as 302 or 304.
Among the best austenitic stainless alloys for high-performance rigging are the “super stainless” variants. Nitronic 50 (also called 22-15-5) offers twice the strength of Type 316 and is used in rod rigging by Navtec. Aquamet 22, containing nitrogen and vanadium, is frequently used in propeller shafts. Their superior performance is reflected in their price.
Passivation and How It Fails
When stainless steel is produced, chromium forms an outer oxide layer. As long as that layer remains intact, the steel remains passive and corrosion-resistant. To stabilize this layer, passivated stainless is immersed in a heated bath of phosphates or salts, forming an oxide film that seals off the iron. Once the oxide layer breaks down, the steel becomes active and corrosion resistance is reduced. Rust is the visible evidence.
The oxide layer is compromised in several ways: pitting and crevice corrosion from microscopic water-retaining cracks or scratches, microscopic impurities, galvanic corrosion, and stress fatigue cracking.
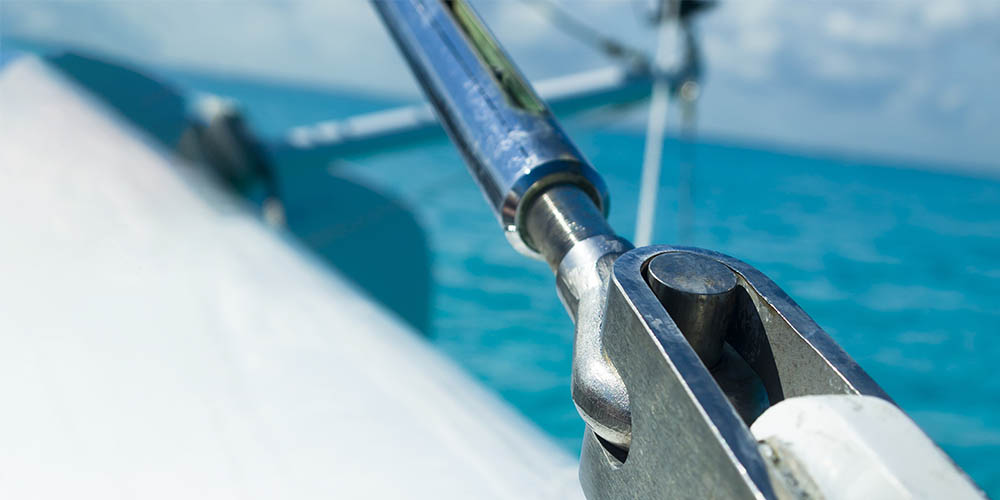
For rod rigging, corrosion fatigue is the most serious threat. Stress concentrates at the rod head, eventually causing invisible cracks. Without disassembling the rig, failure is difficult to predict. Wire rigging is stressed and fatigued every time the boat rolls — over a 10-year service life, this adds up to literally millions of stress cycles. The insides of lower swaged terminals and barrel turnbuckles collect water and corrode invisibly. A failure may be the first indication that your stainless has been deteriorating for years.
Sizing a Type 316 Rig
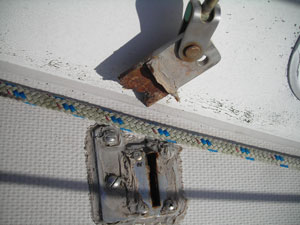
The consequences of neglect: the broken top of an upper shroud chainplate dangles from the toggle above the deck of a Catalina 30. Cover plate slathered in gray sealant masked the corrosion underneath.
Rigs built of 316 stainless will generally outlive those of 302 or 304, especially in warm tropical waters where saltwater corrosion is most aggressive. If you specify 316, consider upsizing your wire by one diameter to compensate for the strength reduction.
Price this carefully before committing. Upsizing one wire diameter increases rigging strength by 15–16%, but cost can increase disproportionately — the wire itself is not the expensive part. The larger turnbuckles, jaws, eyes, and clevis pins required by the larger wire diameter can significantly increase the total budget.
Crevice Corrosion: A Real Example
The story you are about to read is true. The names have been omitted to protect the guilty.
We were helping our friends try out their rebuilt Atomic Four engine on their 1976 Catalina 30 on a perfect February day on San Francisco Bay — 15 knots of wind, glorious bright sun, 62°F temperature, two-foot chop. The engine purred as we motored out of Coyote Point Harbor, raised the main, and unfurled the jib.
We cut the engine and sailed easily along for a few minutes on a beam reach, then began grinding in the jib on the Barient winch to head up onto a beat. Let’s see how she goes to windward! Suddenly, there was a loud BANG and, looking up, we saw the top part of the mast bending alarmingly to leeward, resembling the rig on a Laser. Holy cow!
Quick and decisive action, along with a stout telephone pole mast, allowed us to save the rig. We blew the sheets, went head-to-wind, roller-furled the genoa, restarted the Atomic, and dropped the mainsail. Only then did we notice the bottom of the port upper shroud dangling limp, the turnbuckle swinging and clanging.
The trip back to the slip was drama-free. The cold beers at the dock were most welcome.
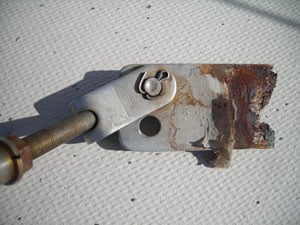
The scene of the crime: water entered at the top of the chainplate. The owners thought their rig was in good shape. Rust never sleeps. Photos: Ann Krieg
This is a classic case of crevice corrosion in an oxygen-starved environment, hidden beneath sealant. Each time the boat tacks, the chainplate flexes slightly relative to the deck it passes through. This tiny motion breaks down the bond between sealant and chainplate, allowing salt water — with its corrosive chloride content — to enter, become trapped, and corrode the stainless from within.
What to Do to Prevent Crevice Corrosion
- Wash down your boat with fresh water after every sail — even if you sail in a freshwater lake. If you can’t get to the boat as frequently as you’d like, arrange with your neighbor to hose each other’s boat down whenever one of you visits. Rust at the top of a chainplate, just below deck level, is caused by contaminants sitting between the toggle and the chainplate. Regular washdowns are the simplest and cheapest prevention available.
- Check chainplates frequently both on deck and inside the cabin for evidence that the seal has been compromised. Use a flashlight inside to check for the slightest sign of moisture or staining. Any leak at a chainplate is dangerous to the rig and — if your deck has a wood or foam core — potentially to the structural integrity of the deck as well.
- If you see any evidence of water intrusion, remove the chainplate and inspect it for crevice corrosion hidden within the thickness of the deck. Have a professional rigger assess if you are unsure. Undetected corrosion at a chainplate can cause the total loss of a rig.
- Inspect swage terminals closely. The point where wire enters a swaged fitting is where corrosion and fatigue most commonly initiate. Look for rust weeping from the bottom of the swage, discoloration, or any cracking of the swage body. These are grounds for immediate replacement.
- Polish your stainless regularly. Use a stainless steel polish like Wichard’s Wichinox. Polishing creates a smooth metal surface that minimizes the pits, valleys, and microscopic cracks where moisture accumulates and corrosion begins. Wichard built its reputation for superior stainless hardware by polishing twice as long as the industry standard.
- Use a 50-power pocket magnifier for a close look at your stainless rigging and fittings at each inspection. Crevice corrosion and stress cracks that are invisible to the naked eye become obvious under magnification.
Standing Rigging Inspection Checklist
Inspect your standing rigging at the start of each season and after any incident involving heavy weather or an accidental gybe. Ten years is the widely accepted replacement interval for standing rigging used offshore — regardless of appearance, wire and swage fittings accumulate invisible fatigue over their service life.
- Are chainplates properly aligned with the turnbuckles, stays, and shrouds?
- Are there signs of leaking around chainplates — on deck or inside the cabin?
- Are terminal fittings (swage fittings, Hi-MOD, Norseman, Sta-Lok, etc.) free from cracks, bends, or rust weeping from the base?
- Are turnbuckles properly lubricated so they turn freely?
- Are turnbuckle barrels secured to the threads with rings, cotter pins, or tightened locknuts?
- Is the standing rigging free from broken wire strands?
- Is the mast straight — not cocked to either side or bowed in the middle?
- If the mast is stepped on deck, is the step properly supported below?
- Are there signs of galvanic corrosion at the base of the mast or where dissimilar metal fittings (winches, cleats) attach to the mast? On a painted aluminum mast, bubbles around fittings indicate corrosion. On an unpainted mast, heavy concentrations of white powder and pockmarks around fittings signal corrosion.
- Are any screws or rivets missing from sail tracks or other fittings?
- Do welds on the mast and boom appear rusted?
- Do spreaders bisect the shrouds at equal angles?
- Are spreader ends secured to the shrouds?
- Are spreader ends protected with rubber boots or tape to prevent sail chafe?
- Are all cotter pins taped to prevent sail damage?
- Do T-terminals show any signs of stress or cracking?
- Are halyard sheaves split, crushed, or badly worn?
- Are masthead mounts tight for radio antennas and wind instruments?
Frequently Asked Questions
What is the difference between Type 304 and Type 316 stainless for rigging?
Type 304 (also called 18-8) is the most common stainless steel and is adequate for many marine applications. Type 316 adds 2–3% molybdenum, making it significantly more resistant to saltwater pitting and crevice corrosion — particularly important in warm tropical waters where corrosion is most aggressive. The trade-off is that 316 is about 85% as strong as 304. For standing rigging in saltwater, 316 is the preferred choice despite the strength difference.
How often should I replace my standing rigging?
Ten years is the widely accepted replacement interval for offshore standing rigging, regardless of appearance. Wire and swage fittings accumulate invisible fatigue stress over their service life that cannot be detected visually. Coastal sailors may extend this interval, but any rig showing broken strands, rust weeping from swage fittings, or cracking at terminals should be replaced immediately regardless of age. Have your rigging professionally inspected if you are planning a significant offshore passage.
What causes crevice corrosion in stainless steel chainplates?
Crevice corrosion occurs when salt water becomes trapped in a confined space with limited oxygen — such as beneath deck sealant at a chainplate penetration. Each tack flexes the chainplate slightly, breaking the seal and allowing salt water to enter. Once trapped, the chloride ions in salt water attack the stainless oxide layer and corrode the metal from within. The damage is hidden beneath the sealant and may be severe before any visible rust appears on deck.
What is the 10-year rule for standing rigging?
Many offshore sailing organizations, insurance underwriters, and professional riggers recommend replacing all standing wire rigging and swage fittings after 10 years of service. The reasoning is that wire and swage fittings suffer cumulative fatigue from millions of stress cycles over their service life, and this fatigue cannot be reliably detected by visual inspection alone. A rig that looks fine can fail without warning. The 10-year interval is a conservative standard — some riggers recommend 7 years for boats that sail frequently in tropical waters.
Related Articles
- How to Correctly Coil Rope
- Removing a Halyard from Your Mast
- Maximum Working Load
- Selecting Line for Running Rigging
- When and How to Replace Your Lifelines
