
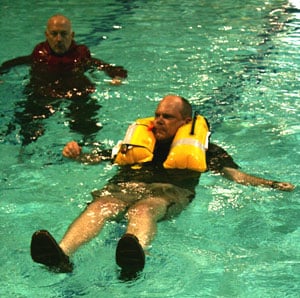
Testing life vests at a Safety-at-Sea Seminar sponsored by US Sailing. Auto-inflate is successful and he has plenty of buoyancy (33 lb.). Inflatables automatically turn the wearer onto their back, maintaining a clear airway even if unconscious.
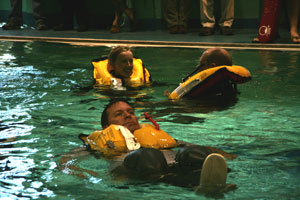
The man in the foreground jumped in with a deactivated vest to test oral inflation. Blowing air in manually took a long time. He still has barely enough air in the bladder — and is getting additional buoyancy from air trapped in his foulies. The lesson: do not rely on oral inflation in an emergency.
We like inflatable life vests because they’re light and comfortable, eliminating many excuses for not wearing them. However, they have to work reliably when you need them most — and that requires owner maintenance. Unlike traditional foam-filled vests, inflatables have several components that must work together, and that is doubly true for vests with automatic inflators and integrated safety harnesses.
- Checking Out Your Brand New Vest
- Regular Inspections When You Put the PFD On
- Detailed Annual Inspection
- When to Replace the CO2 Cylinder
- Inspect the Safety Harness
- Look Inside the Fabric Cover
- Perform a Leak Test
- FAQs
Check Out Your New Vest
The first thing you should do with a new vest — before taking it aboard — is unfold and inflate it using the oral inflation tube to confirm the bladder has no leaks. Leave it inflated overnight. If it still holds air the next day, deflate it, refold it, and use it with confidence. If the new vest won’t hold air overnight, return it for a replacement. This test is simple and establishes a baseline for future leak tests. Learn to do it with your new vest and you won’t hesitate to perform it at each annual inspection.
Regular Inspections When You Put the PFD On
Every time you put on your inflatable PFD, make a quick visual check:
- Check the exterior fabric for abrasions, loose thread, or signs of wear or UV damage.
- Check the Service Indicator visible through the clear plastic inspection window. Green means the PFD is armed and ready to automatically inflate. Red means the vest can only be manually inflated and needs service — it requires a new re-arming kit.
- Verify the oral inflation tube is accessible and unobstructed.
This 10-second check before every use ensures you are not putting on a vest that is unknowingly unarmed.
Detailed Annual Inspection
At least once per year — preferably at the beginning of the boating season — perform a thorough inspection of the inflation mechanism. If you wear your vest regularly, or if your boating location is hot and humid (conditions that accelerate corrosion of the inflation mechanism), inspect every two to three months.
Unfold the vest and carefully remove the CO2 cylinder and the bobbin. Inspect the bottom of the cylinder to confirm it has not been punctured or discharged and shows no denting, corrosion, or surface damage.
The bobbin is the small water-activated trigger that initiates automatic inflation. It works by dissolving when it comes in contact with water — literally like an aspirin pill. When the bobbin dissolves, it releases a spring-loaded pin that pierces the CO2 cylinder, inflating the vest. Check the date stamped on the bobbin. Replace any bobbin more than three years old, regardless of how intact it appears. A bobbin that dissolves too slowly or fails to dissolve will prevent automatic inflation. Do not gamble on out-of-date equipment.
A note on hydrostatic inflators: Some vests, like Mustang models equipped with Hammar hydrostatic inflators, use a pressure-activated mechanism rather than a dissolving bobbin. These inflators activate when submerged to a depth of about 4 inches (10 cm), which means they will not accidentally trigger from rain or spray. The expiration date on Hammar inflators is printed on the exterior of the inflator housing rather than on an internal bobbin. Replace per the manufacturer’s schedule regardless of type.
When to Replace the CO2 Cylinder
- After discharge: Any cylinder that has been fired — by automatic inflation, manual pull, or accidental activation — must be replaced before the vest is re-armed.
- Every 5 years or per manufacturer’s recommendation: Mustang and most other manufacturers recommend CO2 cylinder replacement every 5 years. Check your specific vest’s owner’s manual.
- If underweight: The manufacturer’s instructions specify what the cylinder should weigh when full. Weigh the cylinder with a gram scale. If it weighs less than specified, it has partially discharged and must be replaced. Some cylinders are stamped with their full weight.
- If dented or corroded: Any visible denting or surface corrosion is grounds for immediate replacement. A compromised cylinder may not discharge properly or could fail structurally.
Inspect the Safety Harness
If your vest includes a safety harness, inspect it carefully:
- Check all webbing stitching for fraying, abrasion, or UV degradation.
- Inspect the D-ring that clips to your tether — confirm it is undamaged and moves freely.
- Verify the whistle is present and attached.
- If you have installed a strobe light, confirm it is present and operational (test the battery).
- Inspect the bladder for tears, holes, or deterioration.
- Check the oral inflation tube for cracks and confirm the valve is sealing.
- Confirm reflective tape is intact and securely bonded to the bladder.
Look Inside the Fabric Cover
Most vests have care instructions sewn inside the fabric cover with the part number for the correct re-arming kit for that specific model. This kit contains the replacement CO2 cylinder, bobbin, and any other parts required for re-arming. CO2 cylinders come in a variety of sizes, diameters, and thread patterns specific to each model — always use the exact re-arming kit intended for your vest. Some vests also require pins or pills to activate; these are included in the correct kit. Never substitute components from a different manufacturer or model.
Perform a Leak Test
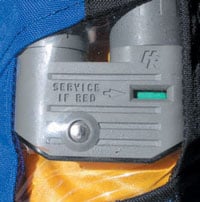
Single-point visual inspection window on the West Marine Coastal Automatic Inflatable vest. Green means the CO2 canister is charged and a bobbin is in place — the vest is armed and ready.
Inflate the vest with the oral inflation tube. Leave it inflated for at least 16 hours. To check for pinhole leaks, submerge the inflated vest in a bathtub or sink and watch for bubbling. Even a slow leak that is not apparent from the pressure drop over 16 hours may be visible as bubbles underwater.
If you are a saltwater boater, give the vest a quick wash in warm soapy water followed by a fresh water rinse. Salt is as corrosive to life vest components as to any other marine hardware, and salt residue in the inflation mechanism can cause premature degradation of the bobbin and other parts.
After the leak test, hang the vest to dry in a well-ventilated location out of direct sunlight. UV exposure degrades the bladder material over time. Once dry, deflate the bladder completely using the small tool attached to the oral inflation tube — squeeze out all air so the device folds compactly enough to fit back into its cover. Re-arm with a bobbin and CO2 cylinder that have not reached their expiration dates, and re-pack per the manufacturer’s instructions.
Wear Your Life Vest with Confidence
With the Service Indicator showing green, your vest is armed, inspected, and ready. The entire point of inflatable life vests — and what makes the extra maintenance worthwhile — is their comfort, light weight, and ease of wear. The best life vest is the one you will actually wear every time you are on the water.
Frequently Asked Questions
How often should I inspect my inflatable PFD?
At minimum, perform a quick visual check of the Service Indicator every time you put the vest on. Perform a full detailed inspection — removing the CO2 cylinder and bobbin, performing a 16-hour leak test, and checking all harness components — at least annually, preferably at the start of each boating season. If you wear the vest regularly or boat in hot, humid conditions, inspect every two to three months since humidity accelerates corrosion of the inflation mechanism.
What is a bobbin and how does it work?
The bobbin is a small water-soluble tablet that acts as the trigger for automatic inflation. When the vest is submerged, the bobbin dissolves (like an aspirin tablet in water), releasing a spring-loaded pin that pierces the CO2 cylinder and inflates the bladder. The bobbin must be replaced every three years regardless of appearance — a bobbin that dissolves too slowly or incompletely will fail to activate automatic inflation. Never rely on a bobbin past its expiration date.
What is the difference between an automatic and hydrostatic inflator?
A standard automatic inflator uses a water-soluble bobbin that dissolves on contact with water, including rain or spray in some conditions. A hydrostatic inflator (such as the Hammar mechanism used in some Mustang vests) activates only when submerged to a depth of approximately 4 inches, preventing accidental inflation from rain, spray, or a splash. Hydrostatic inflators are particularly useful for sailors and boaters who regularly encounter heavy spray or rain on deck. Both types require periodic replacement of the inflation mechanism per the manufacturer’s schedule.
What do I do if my inflatable PFD accidentally inflates?
Deflate the bladder completely using the oral inflation tube deflation valve, allow the vest to dry thoroughly, and re-arm it with a complete re-arming kit (new CO2 cylinder, new bobbin, and any other required components for your specific model). Never re-use an expended CO2 cylinder. A vest that has been accidentally inflated is not ready to wear again until it has been fully re-armed with the correct components.
Where do I find the correct re-arming kit for my vest?
The part number for the correct re-arming kit for your specific vest is usually printed on a label sewn inside the fabric cover. You can also find it in your owner’s manual or by searching the manufacturer’s website with your vest’s model number. Always use the exact re-arming kit specified for your model — CO2 cylinders and bobbins vary in size, diameter, and thread pattern between models and cannot be substituted. See our Inflatable PFD Re-arming Kits Reference Chart for help finding the right kit.