
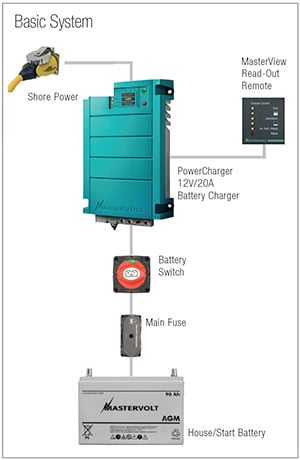
The basic components of a battery charging system.
Before the advent of multi-stage battery chargers, batteries were frequently damaged by over- or under-charging while on shore power. Boat owners often had no choice but to turn the old ferro-resonant charger off except when they were on board. Even then, the charging voltage was frequently too high and the resulting gassing killed many batteries. Today, quality marine chargers use multi-stage charging, monitor the voltage in the batteries, and may be left on continuously if they are installed correctly. We’ll walk you through where and how to mount your charger to make sure your battery bank is always fully charged and ready for your next trip.
- Before You Start
- Installation
- Importance of Wire Size
- DC Wiring Connections
- AC Wiring Connections
- Startup and Test
- Checking Charger Output
- FAQs
Before You Start
Determining where to locate the charger is an exercise in compromise familiar to anyone who has worked on a boat. The charger wants to be relatively close to the batteries — but not too close. One of the most common mistakes in charger installation is locating it directly above the batteries. While keeping the DC cables between the charger and the batteries short is important, batteries give off gases during charging that cause and promote corrosion. Placing the charger too close to the batteries, where it is exposed to these gases, will shorten its life — particularly if the batteries are liquid electrolyte.
Most chargers must remain dry, but at the same time they need adequate ventilation. If the charger must be located in a cockpit locker or lazarette, tuck it in a dry corner — not directly under the hatch. Do not pack life jackets tightly around it or bury it behind other gear. Give it breathing room so it can stay cool.
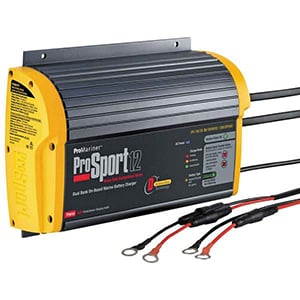
The ProSport 12 marine battery charger ensures that all available charging amperage is fully utilized to meet the unique demands of each onboard battery. After the batteries are charged, the charger monitors and maintains the charge only as needed, reducing its AC power consumption.
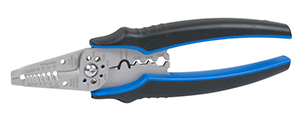
Ancor’s stainless steel wire cutter, stripper and crimper handles 10–22 AWG wire sizes.
If you have a small boat that is wet by nature (sport boat, fishing boat, personal watercraft) and want to install a marine battery charger, purchase a sealed or fully encapsulated charger. These are designed for demanding environments and can operate even when fully submerged (though this is not recommended for extended periods).
Boats with gasoline engines must use chargers that are ignition protected and conform to the appropriate UL specifications, which include testing in an explosive environment. Do not install a non-ignition-protected charger on a gasoline-powered vessel.
Battery chemistry: Confirm your charger is compatible with your battery chemistry before installation. Flooded, gel, AGM, and lithium batteries all require different charging voltage profiles. Most modern multi-stage chargers include selectable profiles for flooded and AGM; lithium batteries typically require a dedicated lithium-profile charger or an external battery management system (BMS) that communicates with the charger. Installing a non-lithium charger on a lithium bank and setting it to an incorrect profile can cause overcharging, which is both dangerous and destructive. Check the charger specifications explicitly against your battery manufacturer’s charging requirements before purchasing.
Safety tip: Unplugging the shore power cord before working on the AC system is good practice — but also turn off the main breaker inside the boat. A dock neighbor may think your cord accidentally became unplugged and plug it back in while you are working on the system.
Tools needed: Common hand tools plus a quality hand crimper that handles a variety of terminals suitable for wire up to #10. If wire larger than #10 is needed, purchase pre-terminated cables or make them up yourself. A drill motor is often needed for mounting.
Chafe protection: AC wiring is the most dangerous wiring on the boat and preventing chafe is critical. A discarded section of the outer jacket, leftover from stripping a cable, can often be used as chafe protection at wear points.
Installation
Once the charger location is selected, fasten it in place. If the charger weighs more than a few pounds, through-bolt it. For a lighter unit, screws into a sufficiently thick bulkhead or structure may be adequate. Use stainless steel fasteners throughout.
The wiring runs are straightforward: DC wiring from the charger to the batteries, and AC wiring from the AC distribution panel (or an outlet) to the charger. Work from the device toward the source — hook up at the charger end first, then connect to the battery last. The rationale is to limit exposure to a live circuit: the battery is always live, so connecting it last minimizes the risk of a short or spark during wiring.
Other Articles on Batteries
Importance of Wire Size
Using the manufacturer’s recommended wire size between the battery and the charger is critical. Undersized wire has a disproportionately large impact on charger performance. Longer runs require proportionally larger wire to maintain acceptable voltage drop.
Most marine chargers do not have separate remote voltage sensing inputs — they measure voltage internally at the charger terminals to determine when to advance through the charging stages. If the DC cable between charger and battery is too small and drops even a fraction of a volt under load, the charger “sees” a higher voltage than the battery actually has and cuts output prematurely. The battery ends up chronically undercharged, and the charger never realizes it.
As a concrete example: if the wire is sized for a 3% voltage drop at full current and the target charge voltage is 14.0V, there will be 0.42V of drop in the wire. The battery sits at 13.58V while the charger thinks it has reached 14.0V. The problem is most severe during high-current bulk charging and essentially disappears when the battery is nearly full and the current tapers to a fraction of an amp. This leads to a deceptive situation where the charger appears to work fine (because it does, at float), while systematically failing to bring the battery to full charge.
The problem worsens with house loads. If a refrigerator compressor cycles on and pulls several amps, the additional voltage drop means the battery may be maintained at significantly below the target float voltage during the load cycle. Over weeks and months this results in chronic partial charge, which reduces the service life of flooded and AGM batteries.
DC Wiring Connections
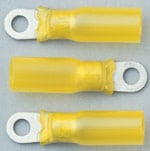
Waterproof Ring Terminals include a short length of adhesive-lined heat shrink tubing to protect the wire termination.
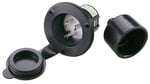
A grounded shore power inlet for a battery charger — a clean option for a boat without an existing AC distribution panel.
Connect DC cables to the charger as directed by the manufacturer. Wire nuts must not be used on a boat — they are a household wiring product that corrodes and loosens in the marine environment. Any wire-to-wire connection must use a butt splice, preferably with adhesive-lined heat shrink tubing, secured inside the wiring compartment on the charger. If the charger is a potted type with cables already embedded in it, do not extend those wires.
If the DC wiring arrives from the factory with alligator clips, cut them off and replace them with proper ring terminals. Alligator clips can cause sparks when connecting or disconnecting, and a spark near a battery can ignite hydrogen gas. Ring terminals with adhesive heat shrink (Ancor Waterproof Ring Terminals are well suited for this application) provide a secure, corrosion-resistant connection.
When connecting to the battery, place the charger wire on top of the existing battery cables — not under them. Coat the terminals with a corrosion preventative. Route DC wires so the terminations are away from the battery caps, where acid and battery gas tend to wick up wire strands and cause corrosion from the inside out. Sealing the terminations and routing them clear of the battery tops significantly extends the service life of the connections.
Shunt wiring: If your battery system uses a shunt in the negative circuit (for a battery monitor), do not connect the charger negative directly to the battery post. Connect it on the same side of the shunt as all other loads and sources. There should be exactly one cable between the shunt and the battery negative post.
AC Wiring Connections
The AC wiring falls into one of two configurations:
1. Charger as the only AC load: If this charger is the only AC device on the boat, install a compact shore power inlet that accepts a standard straight-blade extension cord. Locate it in a protected spot within reach of the AC cord on the charger. Cut off the charger’s AC plug and connect it directly to the AC inlet. Spray all terminals and wire ends with corrosion preventative.
2. Boat has an AC distribution panel: If the boat has an AC breaker panel, supply the charger from a circuit breaker in the panel. Before opening the distribution panel, turn off all AC sources — shore power, inverters, and generators. There may already be a circuit breaker designated for the battery charger. If not, use an unused 15 or 20 amp breaker for the new charger circuit. Run marine-grade three-conductor AC cable between the panel and the charger.
Following the practice of working from load to source, connect at the charger first. The charger will have an AC wiring box for connections. Enter the cable from the bottom if possible — side entry is second choice, top entry last, as it makes it easier for water to enter the wiring compartment. Use strain relief connectors at every cable entry — do not run the AC cable through a knockout without strain relief as it will chafe against the edge. Do not overtighten the strain relief; it only needs to hold the cable in place without crushing the insulation.
Use crimp-type connections throughout — not wire nuts. For extra protection, apply adhesive-lined heat shrink butt splices or tape over exposed connections. When folding the wires into the wiring box, confirm they are not pinched against screws or hardware in a way that could cause chafe.
At the AC panel, secure the cable along its full run before connecting inside the panel. Locate the AC neutral and ground bus bars and connect the white and green wires respectively. The black wire connects to the circuit breaker. Verify the color coding is correct — reversing hot and neutral on an AC circuit is a dangerous wiring error.
Startup and Test
Before energizing the system, check all connections for tightness. Note the battery resting voltage as a reference. Select the appropriate charging profile for your battery chemistry (flooded, gel, AGM, or lithium) per the charger manufacturer’s instructions — do not skip this step. Using the wrong profile can damage batteries or, in the case of lithium, create a safety hazard.
Energize the AC circuit by plugging in shore power and turning on the appropriate circuit breaker. Watch the battery voltage — it should begin rising almost immediately, confirming the charger is operating. Allow it to run through a complete charge cycle, noting the maximum voltage during the absorption stage and the final float voltage. If these voltages do not match the manufacturer’s specifications for your battery type, you may have a voltage drop problem in the DC wiring — check all connections for tightness and confirm wire gauge is adequate.
For liveaboards or boats with significant house loads, check voltage at both the charger terminals and at the battery terminals under full load. They should track within 0.1 volts of each other. A larger gap indicates undersized wire or a poor connection somewhere in the DC run.
Checking Charger Output
To verify the charger meets its rated output, turn on DC loads equal to the charger’s current rating and check whether it can maintain the charging voltage. A quality charger should sustain full rated output at both absorption and float voltages. If it cannot maintain full rated output, reduce the load to approximately 75 percent of rating and test again. If the charger cannot maintain 75 percent, contact the manufacturer — some chargers are rated under optimistic test conditions.
Be present during the first few hours of operation and do not leave a new installation unattended for several days before confirming it is working correctly. Verify the batteries are being float-charged at the correct voltage before leaving the boat.
Absorption stage timing caution: Some battery chargers remain in absorption or acceptance stage until the charge current falls to a specific threshold (for example, three amps). If there is a house load on the boat that exceeds this threshold, the charger will hold the batteries at absorption voltage (14.4V or higher) indefinitely, resulting in overcharging and battery damage. This has been observed on otherwise reliable three-stage chargers. Modern chargers from quality manufacturers use a time limit in addition to current acceptance to force a transition to float mode — this prevents extended periods at high voltage. If you live aboard or leave the boat connected to shore power for extended periods, specifically look for this feature when selecting a charger.
Frequently Asked Questions
Can I use any battery charger on a lithium battery?
No. Lithium Iron Phosphate (LiFePO4) batteries require a charger with a specific lithium charging profile, or a charger that communicates with the battery’s built-in Battery Management System (BMS). Standard chargers set to AGM or flooded profiles typically charge to higher voltages than LiFePO4 batteries can safely accept and may not recognize when the battery is full. Before purchasing a charger for a lithium bank, confirm the charger explicitly supports your battery chemistry and has been tested with the specific battery you are using.
Why is my battery charger not fully charging my batteries?
The most common cause is undersized DC wire between the charger and the battery. Because most marine chargers sense voltage at the charger terminals rather than at the battery, a voltage drop in the cable causes the charger to think the battery has reached full charge before it actually has. Check that the wire gauge matches the manufacturer’s recommendation for your run length. Also check that all connections are tight and free of corrosion, and confirm the charger is set to the correct profile for your battery chemistry.
How close to my batteries should I mount the charger?
Close enough to keep DC cable runs short, but not directly above the batteries where it will be exposed to battery gas and acid vapor. A few feet away on an adjacent bulkhead, with clear ventilation, is ideal. If you must mount it in the same compartment as the batteries, locate it as high as possible and ensure adequate ventilation. Never install a standard charger in a sealed compartment with flooded lead-acid batteries.
Does my gasoline boat need a special battery charger?
Yes. Any boat with a gasoline engine requires an ignition-protected battery charger that meets UL marine ignition protection standards. Gasoline vapors are heavier than air and can accumulate in the bilge. A non-ignition-protected charger with exposed electrical contacts can ignite these vapors. Standard chargers sold for household use are not appropriate for installation on gasoline-powered vessels.
What is the correct wire size for my battery charger?
Follow the charger manufacturer’s wire sizing chart, which specifies gauge by amperage and run length. As a general principle, size for a maximum 3% voltage drop at the charger’s full rated output. Longer runs and higher-output chargers require heavier wire. Err on the side of larger wire — oversized wire never causes a problem, while undersized wire causes chronic undercharging and can generate dangerous heat under sustained high-current charging.