

I thought installing a new hatch would stop the leak in the upper left corner, but the leak is not coming from the hatch. It has migrated from one of the stand-up lead blocks at the base of the mast. My next project will be to re-bed those blocks.
You’re sleeping in the V-berth after a really enjoyable day on the water, awakened by the soft sensation of raindrops on the foredeck. Isn’t it a great pleasure to hear the pattering of rain directly overhead, with you warm and snug below deck.
Then it starts again — that drip from the corner of the hatch directly above your pillow. It’s the pesky, annoying leak you have not been able to find and fix. You know it’s coming from the hatch, but you’ve already taken the hatch out and re-bedded the whole thing, and it’s STILL dripping onto your head.
The dockside wisdom is that this is a major leak, based on the premise that a leak that drips onto your crew’s head is a minor leak, but a leak that drips onto the owner’s head is a major leak.
Leaks in the deck happen to just about all boaters, including Bill Erkelens, who prepares racing sailboats for the Volvo Ocean Race and the America’s Cup. “I do this for a living and my boat still leaks!” says Erkelens. “This year, I’ve tracked down every leak in the deck. This time I’ll get it right.”
- More Than Just a Nuisance
- Cored Decks
- Places Where Water Gets In
- Locating a Migrating Deck Leak
- What to Do When the Core is Wet
- Fixing the Leaking Deck Hardware
- Use the Right Sealant
- FAQs
More Than Just a Nuisance
We’re not discussing leaks from below — the kind that can cause your boat to sink — but instead water that finds its way through rub rails, hatches, ports, cleats, cockpit drain fittings, windshield seams, spotlight bases, and other penetrations.
These leaks stain bulkheads and headliners, damage electronics, and cause upholstery to become soggy and mildewy. They make your boat a wet, smelly environment. They need to be hunted down and fixed.
Cored Decks
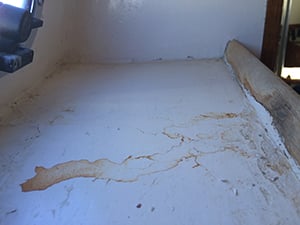
Telltale brown stains on this shelf indicate damage to the plywood core in the deck overhead.
Deck leaks also threaten your boat’s structure. Water infiltrating the deck core causes decks to become soft and spongy, with cracks that weep brown water staining topsides.
Most fiberglass boats are built with sandwich construction: two thin fiberglass skins are the “bread,” with a 3/8” to 3/4” core as the “meat.” The core is most commonly end-grain balsa or marine plywood. Racing sailboats and high-performance powerboats may use closed-cell foam or honeycomb core. All of these materials lose their structural contribution when waterlogged, which is why keeping water out of the core is critical.
Places Where Water Gets In
In theory, when your boat left the factory all deck openings were beautifully sealed and watertight. In practice, even boats from the best manufacturers may have had badly applied sealants from day one, and these locations are the first vectors for water intrusion.
DIY projects from the past: The most common culprits for deck leaks — badly applied or inappropriate sealants failing to keep water out. Stress cracks from impacts (anchors, rigid dinghies dropped on deck) or from structural flexing are another source. Runabouts and center consoles sometimes get water into the transom, eventually compromising the stiffness of its balsa or plywood core. Structural problems may have more serious implications than a leaky deck and may require evaluation by a surveyor.
Traveling leaks: The most challenging to find. Water migrates inside the deck structure. It may be leaking in under a stand-up genoa halyard block next to the mast, travel through voids in the deck, and drip onto your head from the hatch three feet away. This is why re-bedding the hatch — the apparent source — fails to stop the leak.
Stanchions: The vertical stanchions supporting lifelines take a lot of stress. Crew lean on them; they’re used for spring lines and fenders. Often they’re thru-bolted with small, inadequate washers and no proper backing plate. As they loosen and wiggle, fasteners get over-tightened, crushing the wood core. Water follows.
Ports and hatches: Any hardware in the deck or cabin — hatches, ventilation grills, ports — was installed with caulk and/or fasteners. The consensus is that you get about seven to ten years from a deck hardware installation before the sealant begins to fail.
Locating the Source of a Migrating Deck Leak
The most popular method for tracking down a mysterious leak is to pour water from a hose over suspect deck fittings. Move from one fitting to the next while an assistant watches below and notes when the leak starts and stops. This identifies which cleat, stanchion, pad eye, or fitting is the actual source. Adding food coloring to the water and using different colors on different fittings sharpens the diagnosis.
Another method: hook the output of a vacuum cleaner to the inspection port of a small dinghy, seal everything up, and blow air into the hull. Brush soapy water around every fitting and look for bubbles as air escapes. I tried this on my Laser dinghy decades ago and it worked — bubbles appeared at the hull/deck joint, which I repaired with WEST System epoxy.
What to Do When the Core is Wet
If the deck has leaked for a while, the balsa or plywood core may be saturated. This can be a serious problem that may require professional help. Localized wet cores are common on older boats. Extensive damage can mean expensive repairs involving removal and replacement of deck laminate.
If you’re considering buying a used boat, you will likely watch a surveyor tap the hull and deck with a small mallet, listening for a hollow ringing sound (dry, intact core) vs. a dull thud (waterlogged, damaged core). Surveyors also use moisture meters and drill small holes to sample the core directly.
The WEST System videos below show the basics of replacing a small section of damaged core and the hardware bonding process.
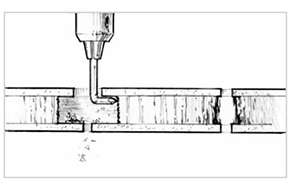
Reaming out the balsa core using the “bent nail” method — step one of hardware bonding. Image courtesy of the Gougeon Brothers.
Fixing the Leaking Deck Hardware
Once you’ve found the source, remove the hardware, clean all mating surfaces, and re-bed.
The Gougeon Brothers (makers of WEST System products) developed an excellent method for sealing fastener openings called hardware bonding. It is one of many excellent DIY resources available at westsystem.com.
The process:
- Drill out the top of the hole oversize — about three times the fastener diameter.
- Use a bent nail in your drill to ream out approximately 3/8” of core material from around the hole.
- Cover the bottom of the hole with masking tape to create a dam.
- Inject a mixture of epoxy thickened to mayonnaise consistency, filling the void from the bottom up.
- Once cured, re-drill your fastener hole to the correct size. You now have a sealed, epoxy-reinforced opening that water cannot penetrate.
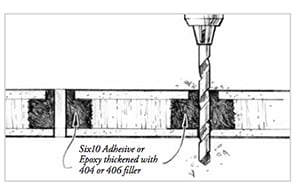
Hardware bonding steps two and three: fill with thickened epoxy, then after curing re-drill the fastener hole.
Replacing and Bedding the Hardware
After sealing the deck penetrations, re-bedding the hardware is the final step. Peel or scrape away every bit of old sealant from both mating surfaces and wipe down with a solvent such as acetone or Life-Calk Solvent and Cleaner. Both surfaces must be completely clean and dry before applying new sealant.
Use the Right Sealant
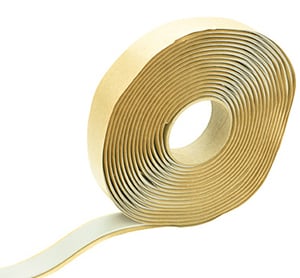
Butyl caulking tape is a popular alternative to liquid sealants for deck hardware bedding.
Many boaters reach for silicone sealant for bedding deck hardware, but polysulfide or butyl rubber tape are generally better options. Silicone is difficult to remove, inhibits paint adhesion around the hardware, and does not bond as reliably to wet or marginally prepared surfaces. Polysulfide and butyl rubber remain workable longer and are easier to clean up. For a detailed comparison, see our West Advisor: How to Select Sealants and Caulk.
Use Enough Sealant
Apply a liberal coating of sealant so it squeezes out around the entire perimeter of the joint. If you don’t see that “good squeeze-out,” the joint will likely leak. A thick enough glue line is the key — this is not the place to economize.
Snug the fasteners without over-tightening: pull the mating surfaces together so both are seated in the sealant with even squeeze-out, then leave everything alone until the sealant cures. Remove the excess by slicing with a razor blade or utility knife once cured. Over-tightening before the sealant cures pushes most of it out of the joint and onto your rag, leaving too thin a sealant layer to keep water out.
Compress the Seal
Once the sealant is fully cured, you can complete the final tightening — and here is the critical technique: tighten the nuts, not the bolts in your thru-bolt assembly. Turning the bolts breaks the cured sealant seal around each one and allows water to penetrate. Tighten at the nut end only, compressing the sealant without disrupting the bond it has formed around the bolt.
That’s our best advice for hunting down and fixing those leaky decks. Good luck — and dry berths.
Frequently Asked Questions
Why does my deck still leak after I re-bedded the hatch?
Almost certainly because the leak is not coming from the hatch. Deck leaks frequently migrate: water enters at one fitting, travels through voids in the deck core, and appears some distance away from the actual source. The hatch drips, so you re-bed the hatch — but the water is entering under a stanchion, a cleat, or a genoa lead block nearby. The only reliable way to find the true source is systematic hose testing of individual fittings one at a time while an assistant watches below, noting exactly when the drip starts and stops.
What is hardware bonding and why is it important?
Hardware bonding is a technique for sealing deck fastener holes with epoxy before re-bedding hardware. The process involves over-drilling the hole, reaming out the core material around it, and filling the void with thickened epoxy. When cured, the epoxy creates a completely sealed, waterproof plug around the fastener. Without this step, even well-bedded hardware can leak because water follows the fastener shaft directly into the deck core. Hardware bonding eliminates this path permanently.
Why shouldn’t I use silicone sealant for deck hardware?
Silicone is difficult to remove completely, and any residue prevents other sealants and paint from bonding to the surface around the fitting. It also does not bond as reliably to imperfectly prepared or slightly damp surfaces. For deck hardware, polysulfide or butyl rubber tape provide better long-term sealing, remain workable longer during installation, and are significantly easier to remove at the next re-bedding cycle.
How long does deck hardware bedding last?
The consensus among experienced boaters and marine professionals is seven to ten years for most deck hardware sealant installations. UV exposure, temperature cycling, vibration, and mechanical stress on hardware (particularly stanchions) all degrade sealant over time. Inspect deck hardware periodically for any signs of lifting, cracking sealant, or rust staining around fasteners. These are signs that re-bedding is due before the leak appears below.
What is the correct way to final-tighten thru-bolted deck hardware?
After the sealant has fully cured, tighten the nuts — not the bolts. Rotating the bolt breaks the cured sealant seal that has formed around the bolt shaft, creating a path for water to follow. Tightening at the nut end compresses the sealant without disrupting the bond it has formed. This is one of the most commonly skipped steps in deck hardware installation and one of the most important for a lasting watertight seal.