
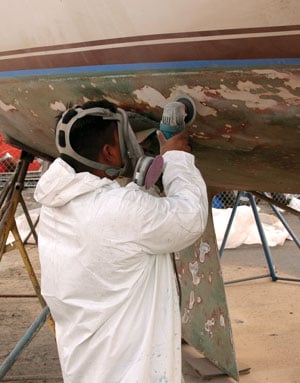
Grinding out a blister and beveling the edge of the repair area to blend into the surrounding surface.
Osmotic blisters are one of the most common and frustrating problems for fiberglass boat owners. They can appear on virtually any fiberglass hull, sometimes after years of trouble-free use, and if left untreated can progress from a cosmetic annoyance to a structural problem. Understanding how they form, whether your boat is at risk, and what to do about them is the first step toward an effective solution.
- What Are Osmotic Blisters?
- Which Project Applies to Your Boat?
- New Boats: Preventive Barrier Coating
- Blister Repair Without Barrier Coat
- Blister Repair with Barrier Coat
- Using a Moisture Meter
- Products We Recommend
- FAQs
What Are Osmotic Blisters?
When fiberglass boatbuilding began in the 1950s, gelcoat was believed to be an impermeable barrier that would keep the underlying resin and fibers dry indefinitely. We now know that is not the case. Blisters appear on some boats and not others — sometimes quickly, sometimes after years of use. Warm water encourages them, and the specific resin system used during construction can influence susceptibility, but even today we cannot reliably predict when a blistering problem will occur.
Understanding how a typical fiberglass hull is built helps explain why blisters form. Mold release wax is applied to the female mold, then layers of gelcoat — the pigmented resin that gives the boat its color and smooth exterior finish — are sprayed on. Fiberglass layers (usually chopped-strand mat and woven roving) are then laminated over the gelcoat, saturated with polyester resin. It is inside this fiberglass matrix that blistering begins.
Tiny amounts of water seep through the gelcoat and begin dissolving chemicals present in the laminate — generally uncured resin or contaminants from the manufacturing process. This solution then attracts additional water through the gelcoat barrier by osmosis. As more water enters, pressure builds, and eventually a blister forms that can delaminate the local laminate. As blisters multiply, you can move rapidly from a cosmetic nuisance to a condition that threatens the structural integrity of the hull.
Sealing the Water Out with Epoxy
Once it became understood that blisters result from water penetrating the gelcoat membrane, the solution followed quickly: a barrier coat — typically epoxy — that seals out moisture far more effectively than polyester gelcoat. Over the past 30 years, techniques and products have matured significantly. Applying a barrier coat is often no more complicated than rolling on bottom paint, and thousands of boat owners have completed this project themselves.
Which Project Applies to Your Boat?
There are three categories of barrier coat work. Identifying which applies to your boat determines the scope and cost of the project:
- Preventive barrier coating on a new or blister-free boat: The boat has no blisters. You are applying barrier coat as insurance before they develop. The easiest and least costly of the three projects. Best done before blisters appear.
- Blister repair without barrier coat: The boat has isolated blisters but the gelcoat is otherwise smooth and damage is limited. You repair the individual blisters and return the boat to service without a full barrier coat system. Less costly but does not prevent future blisters.
- Blister repair with barrier coat: The boat has significant blistering, or you want to eliminate the risk of future problems after repairing existing damage. The most comprehensive and most costly project, but provides the best long-term protection.
New Boats: Preventive Barrier Coating
New boats are frequently delivered with a factory-applied barrier coat and may include a five- or ten-year blister warranty. If your boat has an existing barrier coat and warranty, read the warranty terms carefully before doing anything to the bottom — some warranties are voided by sanding the barrier coat.
If your new boat does not have a factory barrier coat, check whether the builder used vinylester resin rather than standard polyester resin. Vinylester resin is significantly more resistant to osmotic blistering and may reduce your need for a barrier coat. If the builder used standard polyester resin and you keep the boat in the water year-round — especially in warm water — or if other boats from the same builder have a history of blistering, preventive barrier coating makes sense.
It is always easier and less costly to apply a barrier coat to a sound hull than to repair blisters first and then apply the coat. A barrier coat also increases resale value.
Preventive Barrier Coat Application
For a hull with no existing blisters:
- Wipe down the hull with solvent dewaxer to remove all wax and contamination.
- Sand thoroughly to provide mechanical adhesion for the epoxy.
- Apply the barrier coat system per the manufacturer’s instructions, paying close attention to their film thickness requirements. A single coat may provide 3 mils (0.003”) of dry film thickness; 12–20 mils of total thickness is typically required for effective protection. Apply multiple coats within the manufacturer’s recoat window.
- Finish with antifouling paint appropriate for your region.
Blister Repair Without a Barrier Coat
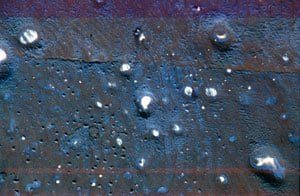
This porous modified epoxy antifouling paint has been scuff-sanded with a disc grinder to highlight the blisters before they dry out and shrink.
When a hauled boat shows isolated blisters but the gelcoat is otherwise smooth and damage appears limited, it may be appropriate to repair just the blisters and defer a full barrier coat to a future haulout.
Step 1 — Identify blisters immediately after haulout: Blisters are most visible and easiest to locate right after the boat comes out of the water, while they are still filled with fluid. Scuff-sand lightly over the bottom to highlight blisters before they ooze out their liquid, deflate, and become difficult to find. Do not delay this step.
Step 2 — Open and clean the blisters: Scrape or grind away the damaged material in each blister until there is no sign of delamination. The repair area should be beveled at the edges to blend into the surrounding sound laminate. Flush each void with fresh water to remove the acidic blister fluid.
Step 3 — Dry thoroughly: Allow the damaged areas to dry completely before applying any epoxy. Depending on temperature, humidity, and the depth of the damage, this can take anywhere from several days to a few weeks. Do not rush this step — epoxy applied over wet laminate will trap moisture and eventually fail.
Step 4 — Seal with penetrating epoxy: Apply a coat of low-viscosity, 100% solids epoxy resin over the opened, dried voids. This penetrating coat seals the laminate surface and provides adhesion for the filler.
Step 5 — Fill with epoxy filler: Trowel an epoxy filler compound into the void. Deep pockets or large areas may require multiple coats of filler. The material will cure even in a thick layer. When the void is filled, sand to match the surrounding hull contour.
Step 6 — Seal and paint: Apply a final seal coat of unthickened epoxy resin/hardener over the filler. This seals the surface before bottom paint. Apply antifouling paint as normal.
Blister Repair with Application of a Barrier Coat
Older boats with significant blistering, or any hull where you want to eliminate future blister risk, require the most comprehensive approach: full blister repair followed by a complete barrier coat system.
The hull laminate must be thoroughly dry before you apply epoxy barrier coat. Any moisture trapped by the barrier coat will eventually cause the coating to fail. “Dry” means the moisture reading of the hull laminate is consistent above and below the waterline, measured with a non-invasive moisture meter. Achieving a dry hull may require:
- Leaving the boat in a dry climate for several months
- Artificially heating the hull surface to drive out moisture
- Using a vacuum system to extract moisture from the laminate
Some professionals strip the gelcoat entirely, test the laminate with a moisture meter, and leave the boat on the hard until the moisture reading equalizes above and below the waterline. This can take months. Yes, months. The goal is to seal moisture out — not to lock residual moisture inside an impermeable epoxy shell.
The application procedure:
- Apply a coat of unthickened epoxy to the dried hull surface as a penetrating seal.
- Fill all blister voids with epoxy filler, fair, and sand to match hull contour.
- Apply 4–6 coats of the barrier coat material to achieve the required film thickness.
Wet-on-wet application technique: Applying multiple barrier coats in the same workday significantly speeds the process. Wait until the coat being overcoated has reached partial cure — still slightly tacky but no longer liquid. Rolling on the next coat at this point allows the two layers to chemically bond without requiring sanding between coats or waiting for full cure. Under ideal conditions, three or more coats per day are achievable this way. Consult the product manufacturer’s instructions for specific recoat windows by temperature — these vary between products and ambient temperatures.
Using a Moisture Meter
A non-invasive moisture meter is an essential tool for blister repair with barrier coat application. It measures the electrical resistance of the hull laminate, which correlates with moisture content, without drilling or damaging the hull surface.
Key guidelines for moisture meter use:
- Establish a baseline: Take readings both above and below the waterline on a freshly hauled boat. Hull above the waterline is your “dry” reference. The goal is for the below-waterline readings to match the above-waterline readings before applying barrier coat.
- Test frequently during drying: Take readings in the same locations every few weeks to track how quickly the hull is drying. Mark test locations with pencil so you are comparing the same spots each time.
- Do not coat prematurely: Wait until readings are consistent across the hull before applying barrier coat. Applying barrier coat over a hull that still shows elevated moisture readings will trap that moisture, which will eventually blister or delaminate the coating from below.
- Temperature and surface condition affect readings: Readings can vary with surface temperature and surface moisture (dew, rain). Always test under consistent conditions — dry surface, stable temperature, same time of day.
Products We Recommend
We offer several proven barrier coat systems:
- WEST System Epoxy: The most widely used marine epoxy system for blister repair and barrier coat work. Excellent penetrating and laminating properties, consistent quality, and extensive documentation for marine applications.
- Interlux InterProtect 2000E: A popular ready-to-use epoxy barrier coat system. Very detailed application instructions with specific coat-by-coat drying times at different temperatures.
- Interlux InterProtect 2000: Low-VOC formulation of the InterProtect system for areas with stricter environmental requirements.
- Pettit Protect: Another effective barrier coat option with a proven track record in the marine market.
All of these systems are effective when applied correctly. Choose the system that best matches your application conditions (temperature, VOC restrictions, skill level) and follow the manufacturer’s instructions precisely — particularly for film thickness requirements and recoat windows. Browse our full selection of barrier coat products.
Frequently Asked Questions
What causes osmotic blisters in fiberglass boats?
Tiny amounts of water penetrate the gelcoat and dissolve chemicals in the fiberglass laminate — typically uncured resin or manufacturing contaminants. This concentrated solution attracts additional water through the gelcoat by osmosis. As more water enters, pressure builds until a blister forms. Warm water, prolonged immersion, and the specific resin system used during construction all affect blister susceptibility, but no hull is entirely immune.
Do all fiberglass boats get blisters?
No — some boats never blister while others from the same manufacturer develop them within a few years. Vinylester resin is significantly more resistant to osmotic blistering than standard polyester resin, and is used by many builders specifically to reduce the risk. A properly applied epoxy barrier coat eliminates the conditions that allow blistering to develop by blocking water penetration at the gelcoat.
Can I apply a barrier coat myself?
Yes — preventive barrier coating on a blister-free hull is well within the capability of most boat owners with basic painting experience. It is straightforward surface preparation followed by careful application of multiple coats within specified recoat windows. Full blister repair with barrier coat is more demanding but also a DIY project for prepared, patient owners. The most important discipline is ensuring the hull is thoroughly dry before applying barrier coat.
How long does the hull need to dry before I can apply barrier coat?
There is no universal answer — it depends on hull thickness, the extent of moisture intrusion, temperature, and humidity. A hull in dry summer storage in a warm, low-humidity climate may be ready in four to eight weeks. A heavily saturated hull in a humid climate may take several months. Use a non-invasive moisture meter to track progress and do not apply barrier coat until readings below the waterline match above-waterline reference readings consistently.
What is the wet-on-wet application technique?
Wet-on-wet means applying each new coat of barrier coat while the previous coat is partially cured — still slightly tacky but no longer liquid. At this stage, the new coat chemically bonds with the partially cured coat below without requiring sanding between coats or waiting for full cure. This allows multiple coats in a single day, significantly reducing project time. The window for wet-on-wet application varies by product and temperature; follow the manufacturer’s specific recoat window timing.
What film thickness of barrier coat do I need?
Most barrier coat manufacturers recommend a total dry film thickness of 12–20 mils (0.012”–0.020”). A single rolled coat typically provides approximately 3 mils dry. This means four to seven coats are required to reach the recommended thickness — most manufacturers specify four to six coats as the minimum for their system. Follow the specific product instructions for your chosen barrier coat, as requirements vary.