Impeller Replacement — Quick Expert Summary
-
The impeller drives raw cooling water through your engine to prevent overheating
-
Inspect impellers during spring commissioning and at least every 200 operating hours
-
Common failure causes include dry running, debris ingestion, and long storage periods
-
Reduced exhaust water flow is often the first sign of a failing impeller
-
Always replace the gasket or O-ring when reinstalling the pump cover
-
Carry a spare impeller onboard — failures typically occur without warning
The flexible impeller is a critical component of most marine engine cooling systems. When it fails, overheating can occur rapidly and cause serious engine damage. Fortunately, inspection and replacement are straightforward with basic tools and preparation.
Symptoms of a Failing or Failed Impeller
Check the impeller immediately if any of the following occur:
-
Engine temperature rising above normal
-
Reduced or intermittent water flow from the exhaust outlet
-
Steam at the exhaust
-
Overheat alarm activation
-
Burning rubber smell near the engine
-
Water pump failing to prime
If cooling water flow stops completely, shut the engine down immediately to prevent severe damage.
Flexible Impeller Pumps
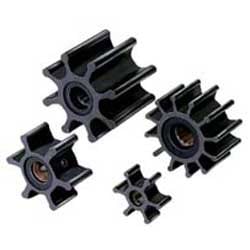
The impeller is a vital component of your engine's cooling system. Keeping a spare impeller on board is a good idea in case of sudden failure.
Inboard and sterndrive engines usually include a flexible impeller type raw water pump. Flexible impeller pumps are common in shower drain sump pumps, some bilge pumps, wakeboard ballast pump systems, oil changing systems and lots of other applications. This article will walk you through how to tell if your impeller has failed, how to find the right replacement impeller and how to swap it out.
- Why Impeller Pumps Fails
- How to Tell if Your Impeller is Bad
- Selecting the Right Impeller
- Neoprene, Nitrile or Polyurethane
- How to Change an Impeller in a Raw Water Pump
Why Impeller Pumps Fail
Flexible impeller pumps depend on water for lubrication and cooling. Running dry — even briefly — can destroy the impeller.
Common causes of failure include:
-
Starting the engine with the seacock closed
-
Debris blocking the raw water intake
-
Plastic bags or weeds sucked into the system
-
Long storage periods causing blades to deform (“taking a set”)
-
Chemical exposure
-
Normal wear from hours of operation
Impellers that sit unused for months can stick to the pump housing and tear apart on startup. For this reason, many boat owners replace impellers annually as preventative maintenance.
How to Tell if Your Impeller Is Bad
If your engine overheats, the raw water pump should be inspected immediately.
Remove the pump cover and examine the impeller. Replace it if you observe:
-
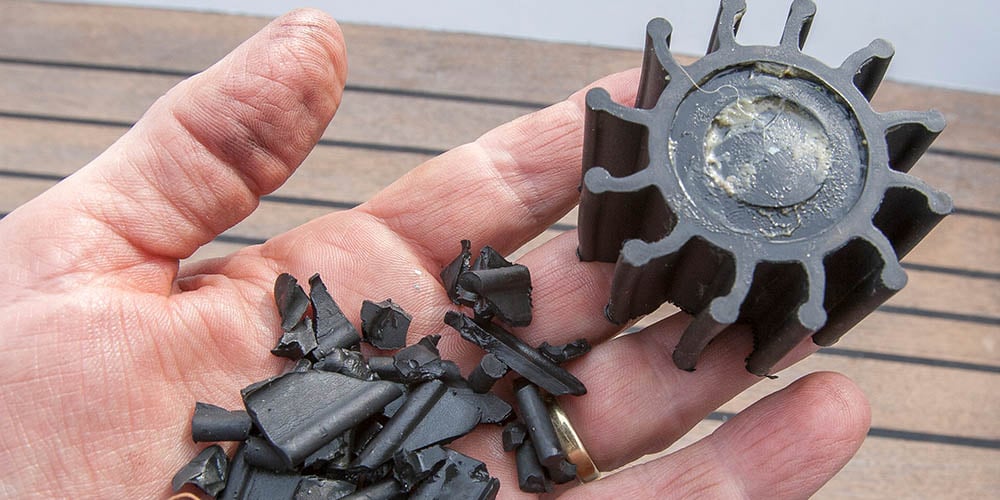
Cracked, torn, or missing vanes
-
Melted rubber
-
Flattened or permanently bent blades
-
Loss of flexibility
-
Pieces missing from the hub
If any vanes are missing, locate and remove the fragments from downstream components such as the heat exchanger. Loose pieces can block coolant flow and cause overheating even after replacement.
Impeller Inspection and Replacement Interval
West Marine recommends inspecting the impeller during spring commissioning and at least every 200 hours of engine operation.
Typical replacement guidance:
-
High-use engines: annually
-
Moderate use: every 1–2 seasons
-
Low use or long storage: replace before returning to service
Preventative replacement is far less costly than emergency repairs resulting from overheating.
Selecting the Right Replacement Impeller
Choosing the correct impeller is essential for proper pump performance.
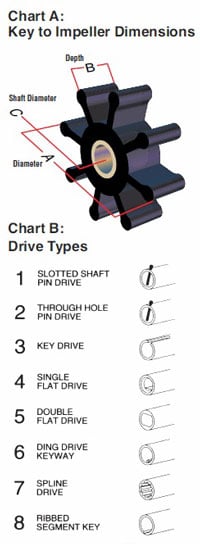
We carry impellers from several manufacturers, including Johnson Pump, Mercury Marine, Sierra and Jabsco. There are several ways to determine the West Marine model number for a replacement Jabsco impeller:
You can identify the correct part using one or more of the following:
-
Pump manufacturer and model number
-
Original impeller part number
-
Impeller dimensions (diameter, depth, shaft size)
-
Number of blades
-
Drive type (keyed, splined, or pin drive)
If the original part number is unknown, remove the old impeller and measure it carefully. Matching the exact dimensions ensures proper fit and water flow.
Impeller Material Selection: Neoprene, Nitrile, or Polyurethane
Different materials are designed for specific applications:
Neoprene
-
Best for engine cooling systems
-
Suitable for fresh or salt water
-
Not ideal for fuel or oil contamination
Nitrile
-
Designed for water contaminated with oil or fuel
-
Common in bilge or transfer pumps
Polyurethane
-
Used in specialized applications such as wakeboard ballast systems
-
Resistant to abrasion and repeated directional changes
Always match the material recommended by the pump manufacturer.
Step-by-Step: How to Replace an Impeller in a Raw Water Pump
Step 1 — Close the Seacock
Shut the raw water intake valve to prevent flooding when the pump cover is removed.
Step 2 — Remove the Pump Cover
Remove the screws or bolts securing the cover plate and carefully take off the cover and gasket or O-ring.
Step 3 — Remove the Old Impeller
Grip the hub with pliers and pull straight out.
If the impeller is stuck, use a dedicated impeller puller tool.
Do not pry with a screwdriver — this can damage the pump housing.
Step 4 — Inspect the Pump Housing
Check for scoring, corrosion, or debris.
Ensure all pieces of the old impeller are accounted for.
Step 5 — Lubricate the New Impeller
Lightly coat the impeller and housing with glycerin, dish soap, or petroleum jelly to prevent dry startup damage.
Step 6 — Install the New Impeller
Compress the blades in the direction of rotation and slide the impeller onto the shaft.
A rubber band or loop of line can help hold the blades compressed during insertion.
Step 7 — Install a New Gasket or O-Ring
Always replace the cover seal to prevent leaks.
Step 8 — Reinstall the Cover Plate
Tighten fasteners evenly in a crisscross pattern. Do not overtighten.
Step 9 — Open the Seacock and Test
Restore water supply, start the engine, and immediately verify strong cooling water flow at the exhaust.
Tools and Supplies Needed
-
Replacement impeller
-
New gasket or O-ring
-
Screwdriver or socket set
-
Impeller puller tool (recommended)
-
Lubricant for installation
-
Container for screws and parts
-
Flashlight
Impeller Replacement FAQs
How often should a boat impeller be replaced?
Typically every 1–2 seasons or every 200 operating hours, though many owners replace annually.
Can I run the engine briefly without water?
No. Even a few seconds of dry operation can permanently damage the impeller.
What happens if an impeller fails while underway?
Cooling water flow stops, causing rapid overheating that can lead to severe engine damage.
Do I need to replace the gasket each time?
Yes. Reusing the old gasket often results in leaks.
Should I carry a spare impeller onboard?
Yes. It is one of the most important emergency spare parts for any boat.
Why is my new impeller not pumping water?
Possible causes include debris blockage, incorrect installation, reversed blade orientation, or missing fragments from the old impeller.