Impeller Replacement — Quick Expert Summary
The impeller drives raw cooling water through your engine to prevent overheating
Inspect impellers during spring commissioning and at least every 200 operating hours
Common failure causes include dry running, debris ingestion, and long storage periods
Reduced exhaust water flow is often the first sign of a failing impeller
Always replace the gasket or O-ring when reinstalling the pump cover
Carry a spare impeller onboard — failures typically occur without warning
By Tom Burden, West Marine Technical Editor | Tom Burden has worked in the marine industry for over 30 years and served as West Marine's Technical Editor.
The flexible impeller is a critical component of most marine engine cooling systems. When it fails, overheating can occur rapidly and cause serious engine damage — seized cylinders, warped heads, and destroyed heat exchangers are all possible consequences of running an engine without cooling water for even a short time. Fortunately, inspection and replacement are straightforward with basic tools, and a boater who knows the signs and carries a spare is well protected against one of the most common causes of on-water engine problems.
Symptoms of a Failing or Failed Impeller
These symptoms indicate the raw water pump should be inspected immediately. Do not continue running the engine until the cause is identified — the window between first symptom and serious engine damage can be very short.
Engine temperature rising above normal operating range
Reduced or intermittent water flow from the exhaust outlet
Steam at the exhaust (indicates water is not cooling exhaust gases before discharge)
Overheat alarm activation
Burning rubber smell near the engine (impeller material degrading from heat or dry friction)
Water pump failing to prime after launch or after the seacock was closed
The easiest symptom to monitor routinely is exhaust water flow. Every time you start your engine, glance at the exhaust outlet within the first 30 seconds. A healthy raw water pump produces a steady, strong flow of water mixed with exhaust gases. Weak, intermittent, or absent water flow before the engine shows any temperature rise is the earliest actionable warning you will get. Make this check a habit and you will catch impeller problems before they become engine problems.
If cooling water flow stops completely, shut the engine down immediately to prevent severe damage.
Flexible Impeller Pumps
The impeller is a vital component of your engine's cooling system. Keeping a spare impeller on board is a good idea in case of sudden failure.
Inboard and sterndrive engines usually include a flexible impeller type raw water pump. Flexible impeller pumps are common in shower drain sump pumps, some bilge pumps, wakeboard ballast pump systems, oil changing systems and lots of other applications. This article will walk you through how to tell if your impeller has failed, how to find the right replacement impeller and how to swap it out.
- Why Impeller Pumps Fail
- How to Tell if Your Impeller is Bad
- Selecting the Right Impeller
- Neoprene, Nitrile or Polyurethane
- How to Change an Impeller in a Raw Water Pump
Why Impeller Pumps Fail
Understanding the failure mechanisms helps you prevent them. Flexible impeller pumps depend entirely on water for both lubrication and cooling of the rubber blades. The blades flex against the pump housing on every rotation, and that flexing generates friction and heat. Water flowing through the pump dissipates that heat and lubricates the contact surfaces. When water is absent, the rubber heats rapidly from friction, the blades stiffen and lose flexibility, and within seconds the vanes begin to crack, tear, or melt against the housing. A dry-run impeller failure can happen faster than an overheat alarm can respond.
Common causes of failure include:
Starting the engine with the seacock closed — the single most preventable cause of impeller failure; check that the seacock is open before every start
Debris blocking the raw water intake strainer, starving the pump of flow
Plastic bags, weeds, or jellyfish sucked into the system, momentarily or permanently blocking intake
Long storage periods causing blades to deform (“taking a set”) — explained below
Chemical exposure from fuel or oil contamination in the water stream
Normal cumulative wear from hours of operation
What “taking a set” means: When a flexible impeller sits motionless for months — during winter storage, for example — the rubber blades remain bent in the same position against the pump cam and housing. Over time, the rubber takes a permanent deformation in that position. When the pump starts after a long layup, the blades no longer spring back to their natural shape, reducing pumping efficiency immediately. Worse, blades that have taken a set are far more prone to cracking on startup because they have lost their elastic recovery. Impellers that sat dry and compressed all winter frequently tear apart in the first minutes of running. This is why many experienced boaters replace impellers as a matter of course during spring commissioning, regardless of apparent condition — the cost of a new impeller is negligible compared to the cost of an overheating event caused by a winter-fatigued impeller failing offshore.
How to Tell if Your Impeller Is Bad
If your engine overheats or shows reduced exhaust flow, the raw water pump should be inspected immediately. Remove the pump cover and examine the impeller. Replace it if you observe any of the following:
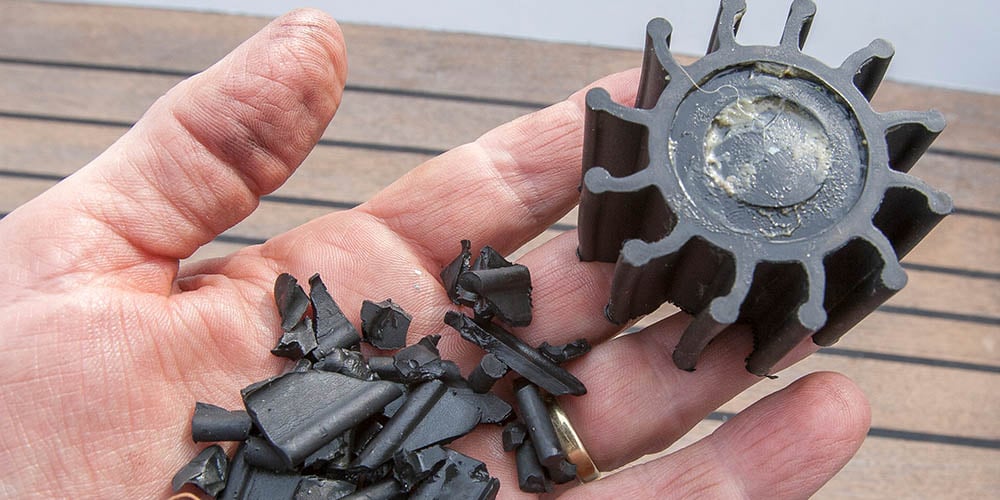
Cracked, torn, or missing vanes
Melted rubber (indicates dry running)
Flattened or permanently bent blades that do not spring back when released
Loss of overall flexibility — the impeller should feel supple and pliable, not stiff
Pieces missing from the hub
Critical step: account for all missing pieces. If any vanes are missing or fragmented, you must locate and remove every fragment from downstream components before restarting the engine. Broken impeller pieces travel with the water flow and lodge in the heat exchanger, aftercooler, or exhaust manifold passages. Even a single fragment can partially block a coolant passage and cause the engine to overheat again immediately after the new impeller is installed. Systematically work through each downstream component — heat exchanger inlet, thermostat housing, and exhaust elbow — and flush or probe until you are confident all fragments are accounted for. This step is skipped more often than it should be, and is the most common reason a freshly replaced impeller appears to "fail" right away.
Impeller Inspection and Replacement Interval
West Marine recommends inspecting the impeller during spring commissioning and at least every 200 hours of engine operation. Inspection means removing the pump cover and physically examining the impeller — not just checking for exhaust flow.
Typical replacement guidance:
High-use engines: annually, at spring commissioning regardless of hours
Moderate use: every 1–2 seasons or 200 hours, whichever comes first
Low use or long storage: replace before returning to service — storage-induced "set" makes condition-based assessment unreliable
Preventative replacement is far less costly than emergency repairs resulting from overheating. At most marinas, a new impeller costs less than $30–$60. A single overheating event that warps a cylinder head or seizes a heat exchanger can cost thousands of dollars and strand you far from home.
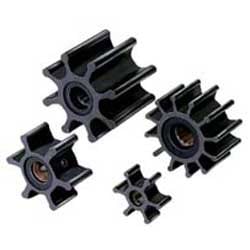
Selecting the Right Replacement Impeller
Choosing the correct impeller is essential for proper pump performance. An impeller that is slightly too small will not contact the pump housing correctly and will deliver reduced water flow. An impeller that is slightly too large will bind in the housing and fail prematurely from excess friction.
We carry impellers from several manufacturers, including Johnson Pump, Mercury Marine, Sierra and Jabsco. There are several ways to determine the West Marine model number for a replacement Jabsco impeller:
You can identify the correct part using one or more of the following:
Pump manufacturer and model number — the most reliable starting point; record this from the pump body before the impeller fails
Original impeller part number, found on the data sheet that came with a Jabsco pump
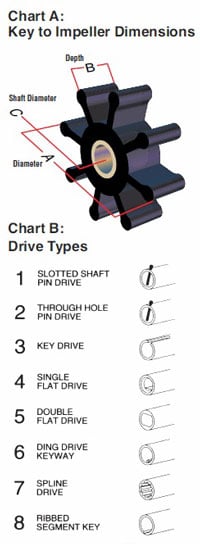
Impeller dimensions: outer diameter, depth (width), and shaft bore diameter — measure carefully with calipers from the removed impeller
Number of blades
Drive type: keyed (flat key on the shaft), splined, or cross-pin drive — refer to the drive type illustrations in the downloadable Jabsco Impeller Replacement Chart below; matching the drive type is non-negotiable, as an impeller with the wrong drive will not engage the shaft
If the original part number is unknown, remove the old impeller and measure it carefully. For Jabsco impellers, you can also identify the Profile Code Letter by placing the impeller on the silhouettes in the Jabsco Impeller Replacement Chart, then measure the depth and identify the drive type from the chart's reference diagrams. Matching exact dimensions and drive type ensures proper fit, correct water flow volume, and full service life.
Impeller Material Selection: Neoprene, Nitrile, or Polyurethane
Impeller material must match the application. Using the wrong compound leads to premature failure — either from chemical incompatibility or from operating conditions outside the material's design range. Always use the material specified by the pump manufacturer.
Neoprene
The standard material for raw water engine cooling applications
Compatible with fresh water and salt water
Good heat resistance and flexibility across the normal operating temperature range of a marine engine cooling system
Not suitable for use where fuel, oil, or petroleum products may be present in the fluid stream — petroleum causes neoprene to swell and degrade rapidly
Nitrile
Designed specifically for applications where the pumped fluid may be contaminated with oil, fuel, or other petroleum products
Common in bilge pumps, oil transfer pumps, and fuel transfer applications
Not a substitute for neoprene in raw water cooling systems — use only where specified
Polyurethane
Used in specialized applications such as wakeboard ballast systems where high abrasion resistance and tolerance for frequent direction reversals are required
More resistant to abrasion from particulate matter than neoprene
Not interchangeable with neoprene in standard engine cooling applications
Step-by-Step: How to Replace an Impeller in a Raw Water Pump
Step 1 — Close the Seacock
Shut the raw water intake seacock completely before removing the pump cover. On most installations the raw water pump is below the waterline; opening the pump with the seacock open will flood the bilge. Confirm the seacock is fully closed and note its location so you can reopen it immediately after reinstallation.
Step 2 — Remove the Pump Cover
Remove the screws or bolts securing the face plate, working evenly around the cover to avoid cocking it against the housing. Carefully take off the cover plate and set aside the gasket or O-ring. Note the condition of the gasket — you will replace it regardless, but its condition confirms whether the pump has been leaking.
Step 3 — Remove the Old Impeller
Grip the hub firmly with pliers and pull straight out with steady pressure. Do not rock or twist aggressively — the goal is to extract the impeller with blades intact so you can account for all pieces. If the impeller is stuck from a dry-run bond to the housing, use a dedicated impeller puller tool, which threads into the hub and extracts the impeller without damage to the housing bore. Do not pry with a screwdriver — the pump housing bore is precision-machined and a scored housing will reduce pump efficiency and accelerate wear on the next impeller.
Once removed, count the blades and compare to the new impeller. If any blades are missing, locate all fragments in the downstream cooling circuit before proceeding.
Step 4 — Inspect the Pump Housing
Examine the housing bore for scoring (circular scratches from debris or a failed impeller), corrosion pitting, or chunks of rubber from a disintegrated impeller. Light scoring does not necessarily require housing replacement, but deep grooves or significant material loss will cause the new impeller to underperform. Clean the housing thoroughly and remove any debris or rubber fragments.
Step 5 — Determine Rotation Direction
Before installing the new impeller, confirm which direction the pump shaft rotates. Most pumps rotate clockwise when viewed from the front (impeller side), but this varies by manufacturer and installation. The easiest method is to look at the cam inside the housing — the blades must be bent in the direction of rotation so they trail rather than lead. Installing an impeller with blades bent the wrong way causes immediate failure as the blades fold back on themselves. If you are unsure of rotation direction, temporarily reinstall the old impeller and bump the engine (or turn the shaft by hand at the coupling or flywheel) to observe which way it turns — then remove it again before starting.
Step 6 — Lubricate the New Impeller
Coat the impeller blades and the pump housing bore lightly with glycerin, dish soap, or petroleum jelly. This lubrication is essential for the first few seconds of operation before water flow is established. Do not skip this step — even a brief dry start after installation can crack the new impeller's blades. Avoid using motor oil or silicone grease, as these can degrade neoprene over time.
Step 7 — Install the New Impeller
Compress the blades by hand in the direction of shaft rotation and slide the impeller onto the shaft, aligning the drive key, spline, or cross-pin with its corresponding slot or hole in the hub. A rubber band or a loop of light line wrapped around the blades can hold them compressed while you push the impeller fully into the housing. The impeller is fully seated when the hub face is flush with or slightly below the housing face. Confirm all blades are trailing in the correct direction once seated.
Step 8 — Install a New Gasket or O-Ring
Always install a new gasket or O-ring rather than reusing the old one. A used gasket compressed under the previous cover will not reliably seal under the new cover, and even a small leak at the pump face will introduce air into the cooling system, reducing pump efficiency. Most replacement impeller kits include the appropriate gasket — if yours did not, source the correct part before reassembling.
Step 9 — Reinstall the Cover Plate
Position the cover plate squarely and start all fasteners by hand before tightening any of them. Tighten in a crisscross pattern to compress the gasket evenly. Snug is correct — overtightening distorts the cover and can crack the housing on plastic-bodied pumps or strip threads on aluminum.
Step 10 — Open the Seacock and Test
Open the seacock fully, start the engine, and immediately observe the exhaust outlet. Strong, steady water flow should appear within 10–15 seconds of startup. If flow is absent or weak after 30 seconds, shut the engine down and investigate before running further. Check that the seacock is fully open, the intake strainer is clear, and the impeller is correctly installed and rotating in the right direction.
Tools and Supplies Needed
Replacement impeller (correct part number, material, and drive type for your pump)
New gasket or O-ring for the pump cover
Screwdriver or socket set matching your pump cover fasteners
Impeller puller tool (strongly recommended — prevents housing damage and makes extraction reliable even when the impeller is stuck)
Lubricant for installation: glycerin, dish soap, or petroleum jelly
Container for screws and small parts
Flashlight or work light
Calipers or ruler (for measuring an unknown impeller)
Rubber band or loop of light line (to hold blades compressed during installation)
Impeller Replacement FAQs
How often should a boat impeller be replaced?
For high-use engines, annually at spring commissioning regardless of hours is the practical standard. For moderate-use engines, every 1–2 seasons or 200 operating hours, whichever comes first. For boats that sit unused for extended periods, replace before returning to service — storage causes rubber blades to deform permanently (a condition called “taking a set”), making condition-based assessment unreliable. The cost of a preventative replacement is always less than the cost of an overheating incident.
Can I run the engine briefly without water?
No. Even a few seconds of dry operation can permanently destroy a neoprene impeller. The blades depend on water flow for both lubrication and heat dissipation. Without it, friction heat builds immediately and the rubber begins to crack and melt. Never run a raw water pump dry for any reason, including testing or priming — always confirm the seacock is open and water is flowing before engaging the engine.
What happens if an impeller fails while underway?
Cooling water flow stops, and engine temperature rises rapidly. If the overheat alarm is functional and you shut down promptly, you may escape with only impeller damage. If the engine continues running without cooling, damage escalates quickly to the heat exchanger, thermostat housing, exhaust manifold, cylinder head, and potentially the block. Carrying a spare impeller onboard and knowing how to replace it while on the water is one of the most practical safety preparations any boater can make.
Do I need to replace the gasket each time?
Yes, without exception. A used gasket has been compressed under the pump cover for its entire service life and will not reliably seal under a new installation. Even a small air leak at the pump face reduces pumping efficiency by introducing air into the water stream. Most replacement impeller kits include the correct gasket — use it.
Should I carry a spare impeller onboard?
Yes. It is among the most important spare parts for any inboard or sterndrive-powered boat. Impellers fail without warning — often from debris ingestion or a momentary dry-run condition that you may not have noticed. A spare impeller, the matching gasket, and basic tools mean a failure that would otherwise require a tow can be repaired in 20–30 minutes at anchor. Store the spare in a cool, dark location to prevent the rubber from degrading before you need it.
Why is my new impeller not pumping water?
The most common causes are: the impeller blades are bent in the wrong direction (blades must trail in the direction of shaft rotation, not lead); a fragment from the failed impeller is blocking a downstream passage in the heat exchanger or exhaust system; the intake strainer is blocked; the seacock is not fully open; or the impeller is not fully seated on the drive. Work through each possibility systematically before assuming the new impeller itself is defective.