Installing one or more DC cabin fans is one of the most rewarding small electrical projects on a boat — the work is straightforward, the tools are minimal, and the result is immediate and practical. On a windless summer day at anchor, a well-placed fan makes the difference between a comfortable cabin and an uninhabitable one. This guide covers fan selection, wiring an installation into an existing circuit, making proper marine electrical connections, and checking that your existing wiring can support the additional load.
Why Install a Fixed-Mount Fan?
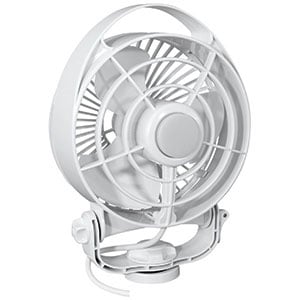
Caframo’s Bora interior fan is ideal for berthing areas, the main salon, cockpit or galley.
Permanently installed fans eliminate the clutter and potential trip hazard of fans with cigarette lighter cords and unlike freestanding fans, they also stay put in a seaway. Also unlike freestanding fans, fixed-mount fans can be installed on a horizontal, vertical or overhead surface — including overhead hatches, angled bulkheads, and tight berthing spaces where a freestanding fan would simply fall over. Typical locations include forepeaks, the galley, main saloon, hanging lockers, and berthing areas.
A fixed fan also improves air circulation in ways that matter beyond comfort. Moving air reduces condensation on hull surfaces, which is a significant contributor to mildew and odor in enclosed cabins — particularly in hanging lockers and the forepeak, where stagnant moist air sits against cold fiberglass. A fan running on low in a hanging locker keeps clothes and gear drier and extends the time between mildew cleanings.
Choose the Right Fan for Your Application
The fans we offer are designed for safe marine operation, with soft “finger-safe” blades and protective grilles — which matter if you have children aboard, and also if you use the fan in a sleeping area where loose fabric could contact a spinning blade.
Key variables to match to your application:
Voltage: Confirm whether your boat runs a 12V or 24V DC system before purchasing. Most recreational boats under 40 feet are 12V; larger vessels with twin engines or generator systems are often 24V. Installing a 12V fan on a 24V system will burn out the motor. Check your breaker or fuse panel if you are unsure — most panels label circuit voltage.
Current draw: Marine cabin fans typically draw between 0.3A and 0.7A at 12V, depending on speed and model. This low draw is one of their advantages — three fans running simultaneously on high draw less than 2A total, which is a negligible load on most boat electrical systems. However, you still need to verify that adding a fan will not push an existing circuit over its breaker rating or cause excessive voltage drop — more on this in the Electrical Considerations section below.
Ignition protection: If you plan to install a fan in a compartment where fuel vapors may accumulate — near the engine, in a bilge area, or adjacent to the fuel tank — you must use a fan with an ignition-protected, sealed motor. Non-ignition-protected fans can spark internally and ignite fuel vapors. The product descriptions for the fans we carry indicate whether the motor is ignition-protected; look for that designation for any installation near potential vapor sources.
Features: Oscillating models cover more area with less concentrated airflow — useful in a main saloon where multiple people are seated in different positions. Multi-speed models allow low-speed quiet operation at night. Timer features available on some models shut the fan off automatically, preserving battery charge.
Follow Best Practice for Marine Electrical Installations
Whether you wire a single fan into an existing circuit or create a dedicated circuit with multiple fans originating at your boat’s breaker or fuse panel, use only wire, terminals, and connectors rated for marine use. Marine-grade wire uses finely stranded tinned copper conductors — the tinning resists the oxidation that corrodes plain copper wire in a salt-air environment, and the fine stranding resists fatigue cracking from vibration. Automotive wire and household wire are not suitable substitutes in a marine environment.
For a thorough overview of acceptable wire gauges, electrical tools, terminals, connectors, and wiring best practices, see our Advisor article on Marine DC Wiring Basics. Nigel Calder’s Boat Owner’s Mechanical and Electrical Manual covers ABYC electrical standards in detail and is the authoritative reference for boat electrical systems at any level of complexity.
Sample Wiring Scenario: Tapping an Existing Circuit

“If you had to choose a single book to help you assess and maintain your boat gear, this would be it.”—Practical Sailor.
The easiest installation taps into an existing 12V circuit — most commonly a cabin lighting circuit, since lights and fans serve the same areas and the combined load is typically well within the circuit’s capacity. Here is a specific scenario: you want to install a fan on the bulkhead in the forepeak, where a lamp is already installed.
Mount the fan on the bulkhead or adjacent cabinetry using the screws provided. Most marine fans come with approximately five feet of lead wire — shorten the leads to the length needed for a clean run to the lamp’s wiring, leaving enough slack at both ends to work with comfortably. The connection can be made at the lamp’s base if it has screw terminals, or by cutting into the lamp’s supply wires at a point close to the base. Connect positive (typically red or marked +) to positive and negative to negative — polarity matters for DC fans with electronic speed controls, and reversing it will prevent the fan from running or damage the control circuitry. To hide wires running along a visible bulkhead surface, cover them with a length of channeled teak wire moulding, which makes the installation look intentional rather than improvised.
Making the Connections Correctly
Most wiring failures in marine electrical systems occur at the connections, not in the wire itself. Two connection methods are never acceptable in a marine installation: twisted wires, and wire nuts. Here is why each fails.
Twisted wires rely on mechanical contact between conductors that corrodes and loosens over time with vibration. In a salt environment, the oxidation at an unprotected bare copper joint increases resistance, generates heat, and eventually causes an open circuit or a fire hazard. Wire nuts — the spring-loaded plastic connectors standard in household wiring — are not watertight and are not designed for the vibration environment of a boat. Salt air penetrates the connector, corrodes the joint, and the spring can back off under vibration, loosening the connection.
The correct method for every connection is a properly crimped, marine-grade terminal. Use a quality crimper and marine-grade butt connectors and wire terminals. Place the terminal in the correct die in the crimper — using the wrong die size either undercrimps (leaving the wire loose) or overcrimps (cracking the terminal barrel). Insert the stripped wire fully into the terminal barrel so no bare conductor is exposed outside it, then squeeze until the jaws close fully. Test every finished crimp with a firm tug — the wire should not pull free. Finish with adhesive-lined heat shrink tubing over the completed crimp, which seals the joint against moisture and provides strain relief.
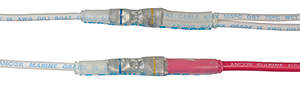
Step-down butt connectors can be used to reduce wire diameter from one gauge to another, or as a multi-wire connector.
For the scenario described above — cutting into an existing lamp circuit — use Step-down Heat Shrink Butt Connectors, which accommodate two wire gauges in one end and provide a watertight crimped seal without requiring separate heat shrink over the joint.
Electrical Considerations: Verifying Circuit Capacity
Before tapping into an existing circuit, confirm the circuit can handle the additional load without excessive voltage drop or overloading the breaker. Here is how to think through it:
Check the breaker rating. Find the breaker or fuse protecting the circuit you plan to tap. Note its amperage rating. Sum the current draw of all devices already on that circuit — LED cabin lights typically draw 0.1A to 0.3A each — and add the fan’s rated current draw. If the total is below 80% of the breaker rating, you have adequate headroom. If it approaches or exceeds the breaker rating, run a dedicated circuit from the panel instead of tapping the existing one.
Check for voltage drop. Even if the total current is within the breaker rating, a long wire run on a small-gauge circuit can cause enough voltage drop to reduce fan performance noticeably. For a typical 30-foot boat with AWG 16 or larger lighting circuits, adding one fan (0.5A) to a lamp circuit creates negligible additional voltage drop. For longer runs or smaller wire gauges, use the 3% voltage drop table in our Advisor article on Marine Wire Size and Ampacity, or use Blue Sea Systems’ interactive Circuit Wizard to calculate quickly. Both tools take the guesswork out of this calculation.
When to run a dedicated circuit. If you are installing multiple fans — for example, one in the forepeak, one in the main saloon, and one in the aft cabin — the combined load (up to 2A or more) is better served by a dedicated circuit from the breaker panel, protected by a correctly sized breaker (a 5A breaker is typically appropriate for a multi-fan circuit of this size). A dedicated circuit also makes it easy to switch all fans on or off from the helm or nav station without affecting cabin lighting.
Frequently Asked Questions: Installing a DC Cabin Fan
Can I wire a cabin fan to an existing light circuit?
Yes, in most cases. Marine cabin fans draw 0.3A to 0.7A, which is a small addition to a typical cabin lighting circuit. Before connecting, confirm that the combined load of the fan and all existing devices on the circuit stays below 80% of the circuit’s breaker rating. On a typical 30-foot boat with AWG 16 or larger lighting circuits, one fan added to a lamp circuit creates no significant voltage drop or capacity issue. For longer runs or multiple fans, calculate voltage drop using the Marine Wire Size and Ampacity table or Blue Sea Systems’ Circuit Wizard.
Why can't I use wire nuts to connect a fan in a boat?
Wire nuts are standard in household wiring but fail in marine environments for two reasons: they are not watertight, allowing salt air and moisture to penetrate and corrode the joint; and the spring mechanism that holds the connection can back off under the vibration of a running engine. A corroded or loose connection at a wire nut generates heat and resistance that can cause an open circuit or a fire. The correct connection method is a properly crimped marine-grade terminal, finished with adhesive-lined heat shrink tubing to seal against moisture.
Do I need a special fan for installation near the engine or fuel tank?
Yes. Fans installed in compartments where fuel vapors may accumulate require a motor rated as ignition-protected. Non-ignition-protected fan motors can produce internal sparks that ignite fuel vapors. The product description for each fan in our catalog indicates whether the motor is ignition-protected. For any installation near the engine compartment, bilge, or fuel tank, this is a non-negotiable safety requirement, not an optional feature.
What wire gauge should I use to wire a marine cabin fan?
For a single fan tapped into an existing circuit, match the gauge of the existing circuit wire — typically AWG 16 for cabin lighting on a recreational boat. For a dedicated multi-fan circuit, use the Marine Wire Size and Ampacity table or Blue Sea’s Circuit Wizard to determine the correct gauge based on total current draw and total wire run length. All wire used must be marine-grade tinned copper — automotive wire is not rated for the corrosion resistance required in a salt-air boat environment.
Can I install a fan on an overhead surface or angled bulkhead?
Yes. This is one of the key advantages of fixed-mount fans over freestanding units. Most marine fans are designed for mounting on horizontal, vertical, or overhead surfaces, and the mounting bracket accommodates a range of angles. Overhead mounting in a v-berth or main saloon directs air downward across sleeping or seating areas and is one of the most effective configurations for nighttime comfort. Confirm the fan’s mounting hardware includes the correct fasteners for the surface material — fiberglass backing plates are recommended behind thin fiberglass surfaces to distribute the mounting load.