
Trailer lights keep your trailer legal with your state’s Motor Vehicle department. More importantly, lights are critical for safety, letting other drivers know where your trailer is and what your intentions are. In darkness and poor visibility, a functioning set of trailer lights is your best insurance against collision (especially rear-enders) and severe damage to your boat. Don’t skimp on the quality of trailer lights. Consider them essential boating safety gear for being on the road.
How Your Trailer Lights Work
Trailer electrical wiring consists of a plug connected to the tow vehicle’s lighting circuitry, a matching connector on the trailer, a wiring harness that runs the length of the trailer frame and a variety of stop, tail, turn signal and side marker lights around the trailer’s perimeter.
Multi-function lights may combine as many as seven functions into one compact fixture, including both lighting functions and reflectors. This makes mounting lights and wiring them substantially easier.
Shining In a Rough, Tough Environment
Trailer lights get the stuffing beat out of them on a regular basis due to:
Suffering thermal shock when warm or hot lights are suddenly submerged in cold water. Submerging the lights cause short circuits, corrosion of the connections and sockets, burned out filaments and cracks in plastic lenses. Corrosion is especially severe in saltwater.
Getting covered and encrusted with road grime, which works its corrosive mischief if it gets into the connections.
Enduring hours of damaging highway vibration that can weaken and break incandescent bulb filaments and loosen lens seals.
A drop in voltage, caused by high current draw from several lights, from the towing vehicle all the way to the taillights of the trailer.
Protruding light covers that attract hard objects such as fences, high curbs or lampposts while backing up.
Is your trailer over or under 80" wide?
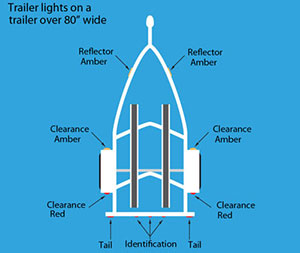
The legal requirements for trailer lights can be grouped into two classes: trailers less than 80" wide, and those that are more than 80" wide. Trailers less than 80" wide are required to have tail lights, stop lights, turn signals, side marker lights and side and rear reflectors on each side. You must also have a license plate light and, on trailers over certain lengths, additional side marker lights and side reflectors are necessary.
Trailers over 80" wide need a few additional lights to help define the perimeter of the trailer. At the rear of the trailer three red identification lights are required and are usually sold as a single bar with the lights mounted at the required spacing (similar to the tops of tractor-trailer rigs and the rear of their trailers). Clearance lights, intended to alert drivers to the width of your trailer, are required on each side and should be placed as far outboard as possible (generally on the trailer fenders).
Matching an Existing Set of Lights
If you’re stuck with lights that don’t illuminate, perhaps a quick fix is all that you need. Before buying a set of replacement lights, clean the mounting bolts on the existing lights with a wire brush. Many lights ground electrically to the trailer frame through the mounting hardware, and an improper or “bad” ground is a common cause for lights not working.
If you have chronic trailer light problems and your current lights look pretty beat up, consider replacing the whole shebang. New trailer light kits with wiring harnesses are available at a moderate price, and can be installed in an hour of so.
Split Y Wiring Harnesses
Most trailers use a “split Y”, aka “wishbone” wiring harness, which splits at the trailer’s tongue and runs down each side of the frame. All of our Trailer Light Kits that include a wiring harness come with this type of harness. “Split Y” wiring harnesses are also available as a separate purchase.
Crossover Wiring Harnesses
Your trailer’s lights may be wired with a crossover wiring harness, that runs down one side of the trailer and across between the taillights. If it needs replacement, consider our 4-Pin Crossover Trailer Wiring Harness.
Replacing Your Trailer’s Wiring Harness
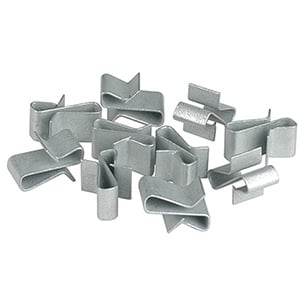
How you run and secure your wiring harness will vary with how your trailer is constructed. For trailers with channel iron or I-beam construction, using Trailer Frame Wire Clips to secure the wiring harnesses results in a neat installation.
Replacing a Split Y wiring harness that runs through a trailer frame made of steel or aluminum box tubing requires a different approach. In this case, to replace a Split Y wiring harness, at the back end of the trailer, cut each arm of the “Y” and attach each to a small diameter cord (or wire) to serve as a messenger line. Make sure that the messenger line is a couple feet longer than the length of the wire run. Then, at the forward end of the trailer, pull the old wiring harness out. Next, securely tie the messenger lines (which are now hanging out the front end of the trailer) to each arm of the new Split Y harness. Then, working from the back end of the trailer, slowly pull on both of the messenger lines until the arms of the new Split Y harness exit out the back end of the trailer.
In the case of a crossover wiring harness, the old harness can serve as the messenger line. Cut the trailer plug from the old harness and tie the end of the new harness to the old. Then carefully pull the old harness out the rear of the trailer.
Advantages of LED Trailer Lights
LEDs address many deficiencies of conventional trailer lights, which burn out from vibration and cold water, and use more electricity. LED advantages include:
- Higher life expectancy: LED lights are rated at up to 100,000 hours of service life compared to 3,000 hours for incandescent lights, plus LED lights have no filaments to break due to vibration. This virtually guarantees that you will never have to replace a bulb again and the lights will probably last the life of your trailer (except for the occasional navigation error where you back your trailer into a fence...)
- LEDs are impervious to submersion and road grime: LED lights are permanently sealed in a welded polycarbonate lens so there are no bulb bases to short or corrode.
- No thermal shock: LED lights generate very little heat so that thermal shock due to immersion is not a problem.
- Minimal voltage drop: LED lights draw 1/8th the current of comparable incandescent lamps so that the voltage drop is minimal.
- Low profile: LED lights are very low profile so that there is less chance of collision damage to a protruding light.
- LED lights activate instantly: Drivers behind you have an extra half-second to apply their brakes when you make a quick stop.
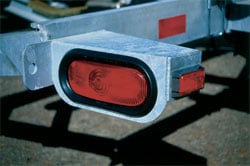
Waterproof Lights
Other Articles on Trailering
Safe and Trouble-Free Trailering
A submersible light allows water into the unit when submerged. The bulb and socket are protected by an air pocket formed by the “Bell-jar principle” which permits only a certain amount of water to enter, not allowing water to come in contact with the bulb. Some lights of this type also have the bulbs sealed inside waterproof “capsules” that protect them from corrosion and thermal shock.
Lights that are truly waterproof, such as our Sealed Oval Trailer Light Kit, are sealed so no water gets inside. LED lights are all permanently sealed.
Wiring Color-Codes and Plug Adapters
As shown below in the Wiring Harness Color & Function Chart, basic color-coding is simple. The white wire is the ground wire, which should be connected directly to the trailer’s frame. The brown wire supplies voltage to both the red taillights in the back, and to the clearance and identification lights. The green wire is for the right turn indicator, and the yellow wire is for the left turn indicator.
Don’t use household “wire nuts” on your trailer. Make the connections to your lights with waterproof adhesive-lined butt connectors and keep corrosion out of the wiring. Use a quality wiring tool like the Ancor Stainless Steel Wire Cutter Stripper Crimper.
European, Japanese and some American vehicles use separate circuits for turning and for the brake lights. If your vehicle uses amber rear turn indicators, or uses a different area of its light fixture for turning and braking, you’ll need a five wire-to-four wire plug adapter. These are relatively cheap and can be made a permanent part of the tow vehicle wiring harness.
| Trailer Light Wiring Harness Color & Function Chart | |||||||
|---|---|---|---|---|---|---|---|
| Connector Style | Wire Function | Wire Color | Connector Style | Wire Function | Wire Color | ||
|
6-Way |
5-Way |
4-Way |
Dual-Filament Bulb Systems |
7-Way |
Dual-Filament Bulb Systems |
||
|
Right Turn & Brake Lights |
Green |
Right Turn & Brake Lights | Brown | ||||
| Left Turn & Brake Lights | Red | ||||||
| Left Turn & Brake Lights | Yellow | Tail Lights & Clearance Lights | Green | ||||
| Tail Lights & Clearance Lights | Brown | Auxiliary (Center Pin) | Yellow | ||||
| Ground | White | Ground | White | ||||
|
|
Backup Lights | Red | Electric Trailer Brakes | Blue | |||
|
|
Electric Trailer Lights | Blue | Auxiliary Power & Battery Charge | Black | |||
Inspect Your Lights
Before you trailer your boat, always perform a walk-around light inspection. Checking the lights requires connecting the tow vehicle to the trailer with a helper to work the controls for the turn signals, taillights and brake lights. A couple times per season you should perform a more detailed inspection. Take a look at every inch of the wiring harnesses, and secure any loose sections to the trailer’s frame with wire ties or cable clamps. Look for nicks in the wiring that could cause a short circuit. Inspect the wiring plug at the coupler end, clean the contacts with 400-grit sandpaper, and lubricate with dielectric grease or contact cleaner.