
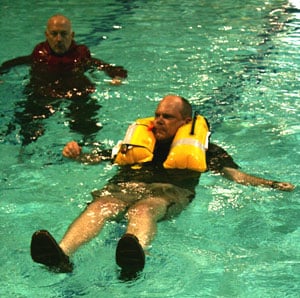
Testing life vests at a Safety-at-Sea Seminar sponsored by US Sailing. We also inflated a life raft in the pool and practiced boarding, capsizing and righting the raft. We highly recommend these seminars if you’re heading offshore.
Auto-inflate is successful and he has plenty of buoyancy (33lb.). Inflatables automatically turn the wearer onto your back, maintaining a clear airway even if you’re unconscious.
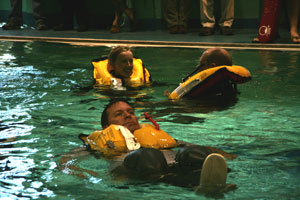
The man in the foreground jumped in with a vest that was deactivated just to see how difficult it was. Blowing air in orally took a long time. In the photo he still has barely enough air in the bladder, and is getting more buoyancy from the air trapped in his foulies.
We like inflatable life vests because they’re light and comfortable, eliminating many excuses for not wearing them. However, they have to work reliably and that requires a bit of owner-maintenance. Unlike traditional, foam-filled vests, inflatables have several components that have to work together for the vest to function and that is doubly true for vests with automatic inflators and safety harnesses.
Check Out Your New Vest
We recommend that the first thing you do with a new vest—before taking it aboard—is to unfold and inflate it using the oral inflation tube to be sure it has no leaks in the bladder and is safe to wear. Leave it inflated overnight. If it is still holding air the next day, deflate it, refold it and use it with confidence. If the new vest won’t hold air, return it to us for a replacement. This test is very simple to perform and if you learn how to do this as soon as you get your vest, you won’t put it off when it’s time for the detailed inspection we’ll discuss later.
Regular Inspections When You Put the PFD On
Check the exterior for abrasions, loose thread or other signs of wear. Make a habit of checking the Service Indicator that is visible inside the clear plastic window to make sure the status is green. Green means your PFD is armed and ready to inflate. Red means the vest can only be manually inflated and needs service. In that case, you'll need a rearming kit.
Detailed Inspection
At least once per year, preferably at the beginning of the boating season, you should inflate your PFD and go over the CO2 cylinder, the bobbin and any other of the various pins or parts that make it work. We recommend performing this inspection every two to three months if you wear your vest regularly, or if your boating location is hot and humid, since the inflation mechanism may be subject to corrosion.
This time, unfold the vest and carefully remove the CO2 cylinder and the bobbin. Check the bottom of the cylinder and make sure it has not been punctured and discharged and that it does not show any sort of damage. Check the date that is stamped on the bobbin (note that some vests, like the Mustang models with the Hammar hydrostatic inflators, have the expiration date printed on the exterior of the inflator). If the bobbin is more than three years old, get a new one regardless of how intact it appears to look. Bobbins have to dissolve like an aspirin pill when they come in contact with water, which is how the device activates itself, so don’t mess around with out-of-date equipment.
If your vest has a safety harness, check the stitching, inspect the D-ring that clips to your tether and be sure the whistle is still present (as well as an operational strobe light, if you’ve installed one). Be sure the bladder is intact without tears or holes and that the oral inflating tube and reflective tape are in good shape.
Most vests have care instructions sewn inside the fabric cover that will cover all of this in detail and provide the part number for the re-arming kit you may need to purchase that will contain the cylinder, bobbin and other replacement parts. Cylinders come in a variety of sizes, diameters and thread patterns specific to each model of life jacket. Some vests also need pins or “pills” to activate. Always use the exact model of re-arming kit intended for your specific model of vest.
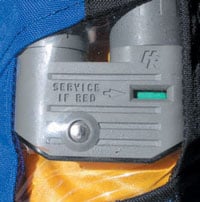
Single-point visual inspection window on our West Marine Coastal Automatic Inflatable vest. 1F type inflator. Green means the CO2 canister is charged and a bobbin is in place.
Inflate the vest, as before, with the oral inflation tube. Leave it inflated for at least 16 hours. Consider giving the vest a quick wash in warm soapy water, followed by a rinse with fresh water, especially if you’re a salt-water boater, since salt is just as gritty and corrosive to life vests as to other boating gear. You can also perform the leak test by submerging your vest in a bathtub or sink and check it for pinhole leaks.
When you’ve finished, hang the vest up to dry in a well-ventilated location that’s out of direct sunlight. After it dries, deflate it using the small tool attached to the oral inflation tube, carefully squeezing out all the air so the device will fold compactly enough to fit back into its cover. Then re-arm your PFD with the bobbin and CO2 cylinder (both of which have not yet reached their expiration dates) and re-pack the vest according to the manufacturer’s instructions.
Now, with the Service Indicator showing green, you can wear your life vest with confidence. The point of inflatable life vests, and what makes them worth these extra maintenance chores, is their comfort, light weight and ease of use. The best life vest, after all, is the one you will wear whenever you’re on the water.