
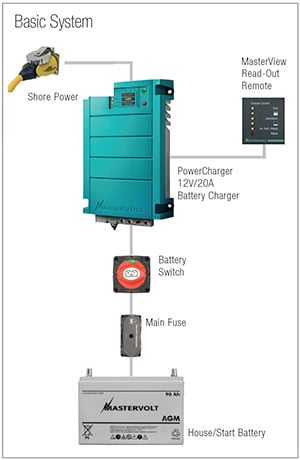
The basic components of a battery charging system.
Before the advent of multi-stage battery chargers, batteries were frequently damaged by over- or under-charging while on shore power. Boat owners often had no choice but to turn the automotive type ferro-resonant charger off except when they were on board. Even then, the charging voltage was frequently too high and the resulting gassing killed many batteries. Today, quality marine chargers use multi-stage charging, monitor the voltage in the batteries, and may be left on continuously if they are installed correctly. We'll walk you through where and how to mount your charger to make sure your battery bank is always fully charged and ready for your next trip.
- Before Your Start
- Installation
- Importance of Wire Size
- DC Wiring Connections
- AC Wiring Connections
- Startup and Test
- Checking Charger Output
Before You Start
Determining where to locate the charger is an exercise in compromise so common to many boats. The charger wants to be relatively close to the batteries—but not too close. One of the most common mistakes in charger installation is locating it directly above the batteries. While keeping the DC cables between the charger and the batteries short is important, batteries give off gasses that cause and promote corrosion during charging. Placing the charger too close to the batteries, where it is exposed to these gasses, will shorten its life, particularly if the batteries are liquid electrolyte.
Most chargers must remain dry, but at the same time they need adequate ventilation. If the charger must be located in a cockpit locker or lazarette, be sure and tuck it in a dry corner—not directly under the hatch. Do not stuff all Coast Guard required life jackets tightly around it or bury it behind other gear. Give it some breathing room so it can stay cool.
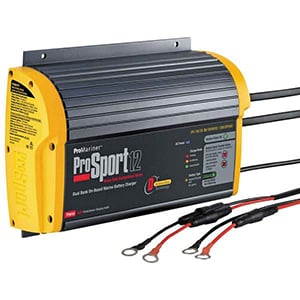
The ProSport 12 marine battery charger ensures that all available charging amperage is fully utilized to meet the unique demands of each onboard battery. After the batteries are charged, the charger monitors and maintains the charge only as needed—reducing its AC power consumption.
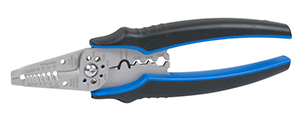
Ancor’s stainless steel wire cutter, stripper and crimper handles 10-22AWG wire sizes. It’s a very good tool for this job.
If you have a small boat that by its nature is wet (sport boat, fishing boat, personal watercraft) and want to install a marine battery charger, you need to purchase a sealed or fully encapsulated charger. These chargers are designed for use in demanding environments and can operate even when fully submerged (however, this is not recommended).
Boats with gasoline engines must use chargers that are ignition protected and conform to the appropriate UL specifications, which include testing in an explosive environment.
West Advisor safety tip: Unplugging the shore power cord before working on the AC system is good practice, but please remember to turn off the main breaker inside the boat as well. A dock-mate may think your cord accidentally became unplugged and do you the “favor” of plugging it in while you are working on the system.
The right tools for the job: You will need common hand tools, and a quality hand crimper that can handle a variety of terminals suitable for wire up to #10. If wire larger than #10 is needed, you will have to purchase pre-terminated cables or make them up yourself. A drill motor might also come in handy.
Craftsmanship tip: AC wiring is the most dangerous wiring on the boat and preventing chafe is critical. A discarded section of the outside jacket, leftover from stripping out a cable, can often be used as chafe protection.
Installation
Once the location for the charger has been selected, it may be fastened in place. If the charger weighs more than a few pounds it should probably be through-bolted. If it is of modest weight, and the bulkhead or structure it is to be fastened to is sufficiently thick, then screws may be used. Be sure to use stainless steel fasteners.
The wiring for the charger is fairly straightforward, with the DC wiring going from the charger to the batteries, and the AC wiring coming from the AC distribution panel to the charger, or an outlet box adjacent to it. We will consider the DC wiring first.
Good wiring practice is to hook up from the device toward the source. In this case the battery is the source. You might think the charger is a source; well, that's right but not unless the AC power to it is turned on. The idea is to limit one’s exposure to a live circuit. Thus, we hook up the source—the batteries—last.
Other Articles on Batteries
Importance of Wire Size
It is critical to use the manufacturer’s suggested wire size between the battery and the charger. This will have a disproportionately large impact on how well your battery charger works. The wire size required will be based on the distance from the charger to the batteries; longer runs require proportionally larger wire. If the wire is too small, the resulting voltage drop can cause the battery to be chronically undercharged and increase charging time. How come?
Most marine chargers do not have separate voltage sensing inputs. They depend on measuring the voltage inside the charger for the “sense” voltage used to control the charger output. If the wire is sized for three percent drop at full current and the charge voltage is 14.0V, that means there would be 0.42V drop in the wire alone. Thus, the battery would be at 13.58V not the desired 14.0V. This problem is most severe during high-current charging. In fact, when the battery is full and only requires a few tenths of an amp to maintain the float voltage, the problem goes away.
So why bother? Two reasons: First, small wires slow the charge rate long before the battery is full. Second, if there are house loads consuming current, the voltage drop from the charger to the batteries will cause the batteries to be maintained at too low a voltage. This is particularly a problem for liveaboards and worsens with lower float voltages. In fact an intermittent load such as a refrigerator, which comes on regularly and consumes several amps, will lower the average voltage seen at the battery; everything looks fine with the fridge off but when checked with the fridge on the voltage falls by two or three tenths of a volt.
DC Wiring Connections
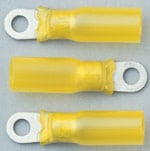
Waterproof Ring Terminals include a short length of adhesive-lined heat shrink tubing to protect the wire termination.
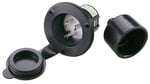
A grounded inlet for a battery charger, great for a boat without a shore power system or distribution panel.
The DC cables should be connected to the charger as directed by the manufacturer. Wire nuts, common in household applications, must not be used. If a wire-to-wire connection must be made it should be done using a butt splice, preferably one with adhesive heat-shrink tubing and secured inside the wiring compartment on the charger. If the charger is a potted type and has cables embedded in it, do not extend the wires. If the DC wiring is terminated with alligator clips they should be cut off and terminated with proper ring terminals to prevent the alligator clips from causing a spark, which could lead to a battery explosion.
When connecting the wires to the battery, put the charger wire on top of the big battery cables, not under them. Spray or coat the terminals with a corrosion preventative. Try to use closed barrel terminals and heat shrink or tape over the terminal (Ancor Waterproof Ring Terminals are excellent in this application). The most common wiring failure is corrosion caused by acid and gas wicking up the wire leading to eventual failure. Sealing, corrosion preventatives and routing wires so the terminals are away from the battery caps help forestall failures due to corrosion. If your system uses a shunt in the negative of the battery system, do not connect the charger negative directly to the battery. It must connect on the same side of the shunt as all the loads and sources on the boat. There should only be one cable between the shunt and the battery.
AC Wiring Connections
The AC wiring can be as simple as plugging the charger into an extension cord and running that to an outlet in your garage. This would be appropriate for a fishing boat, ski boat or runabout. If a permanent installation is desired it is likely to fall into one of two categories: 1) the charger is the only load on the boat and thus is wired from the shore power inlet to the charger; 2) the boat has a distribution panel (AC breaker panel) and the charger is wired to a breaker in the panel. Let’s consider each.
1) If the charger is the only AC device on the boat you may install a compact shore power inlet that accepts a standard straight blade extension cord. Locate it in a protected spot within reach of the AC cord on the charger, cut off the charger’s AC plug, and connect it to the AC inlet. Spray the terminals and wire ends with a corrosion preventative as you make it up.
2) If the boat has an AC distribution panel you will want to supply the charger from one of the circuit breakers in the panel. Before working in the distribution panel, be sure all AC sources are off (this includes inverters and generators that may supply the panel). There may already be a circuit breaker designated for the battery charger. If not, pick an unused breaker of 15 or 20 amps for the new charger circuit. Run an appropriate marine-grade, three-conductor AC cable between the panel and the charger.
Following our good practice of working from the load to the source during hookup, we first make up the charger. It will probably have an attached AC wiring box for connections. Typically these boxes have knockouts that allow the cable to enter from a variety of directions. It is best to enter from the bottom, if possible, with the sides as second choice. Top entry should be the last choice since it makes it easier for water to enter the wiring compartment. Be sure to use strain relief connectors; do not run the AC cable through the knock out alone as it might chafe. Do not overtighten the strain relief, as it can crush the insulation and cause a short or a hot spot. All it has to do is hold the cable in place.
Proper Connections
As with the DC connections, the AC connections should be made with crimp type connections—not wire-nuts. For extra protection, apply tape on top of the connections or use butt splices with adhesive-lined heat shrink tubing. When folding the wires into the wiring box, be sure they are not pinched or rubbing against screws or fittings in such a way as to cause chafe.
Now to the AC panel. Be sure the cable is securely fastened along its length and as it enters the panel space. Tie it into the wire loom such that it does not bind the panel as it is opened. Locate the AC neutral and ground and connect the white and green wires respectively. The black wire will connect to the circuit breaker.
Startup and Test
Before starting up the system, check all connections for tightness. Check the battery voltage for a reference. Select the appropriate charging regime, so it will follow the right charging sequence and use the correct voltages for your flooded, gel, AGM or other compatible battery chemistry, per the manufacturer’s instructions. Energize the AC circuit by plugging in shore power and turning on the appropriate circuit breaker. Watch the battery voltage, it should begin rising almost immediately. This indicates the charger is operating.
Allow the charger to go through a complete charge cycle, noting the maximum voltage during acceptance and the final float voltage. If necessary, adjust the charge regimen to meet the specifications required by your batteries. If there is a larger disparity between the manufacturer’s specifications and your reading, you may have a voltage drop in your wiring. Check all connections for tightness and be sure the wire size is adequate.
If the boat is a liveaboard with heavy loads be sure to check for voltage drop under full load at the charge voltage and the float voltage. Check the voltage at the charger and at the batteries. They should track within 0.1 volts or so.
Checking Charger Output
You may also want to ensure that the charger lives up to its rating. You can do this by turning on DC load up to equal to the current rating of the charger to see if it can maintain the charging voltage. Ideally the charger will be able to sustain full rated output at both the acceptance and float voltages. If it cannot maintain full rated output, reduce the load to about 75 percent of rating and test again. If it cannot maintain 75 percent, you may want to call the manufacturer to see if they rated the charger under optimistic conditions.
It is best to be present during the first few hours of operation of any new charging source and not to turn on a new installation and walk away from the boat for several days. It’s important to verify the batteries are happily being float-charged by the new charger.
One final caution. Some battery chargers stay in acceptance or absorption stage until the charge current falls to a specific level (perhaps three amps). That is, the charger will continue to hold the batteries at 14.4 volts indefinitely if there is some load on the boat that exceeds the target current. We discovered this on a reliable but simple three-stage charger that we sold several years ago, and it was responsible for overcharging some of our customers’ batteries. Modern chargers, like those from Xantrex, will use a timer in addition to the current acceptance of the batteries to cause them to revert to float mode. This prevents extended times at high voltages, and is an excellent feature to specify—especially if you live aboard.