Performing a Seasonal Trailer Tune-up
Why Regular Maintenance Matters
Trailers may be the most neglected item of boat related equipment, in spite of the fact that they open up vast horizons of boating adventure, allowing us to explore locations far remote from our normal local waterways.
We tow our own boats all over the Western United States, and must admit we—or our friends—have experienced most of the common trailering disasters. Improperly secured gear has taken flight from our boats. Wheels, with inadequate lug nut tension, have launched themselves from hubs, rolling past us at 55 MPH. We have abandoned a boat and trailer far from home on a Sunday evening with seized wheel bearings because we neglected to carry spare bearings. Once our trailer detached from the tow vehicle on a highway—miraculously surviving without damage to our vessel or those sharing the road—because we forgot to secure the trailer with safety chains.
Since many boaters are not blessed with that share of luck necessary to compensate for carelessness, we will list a few spare parts, safety procedures and quick systems checks that will help assure trouble-free and worry-free trailering. The beginning of the boating season is the best time to give your trailer a once-over. It is easy to do, and a few hours of vigilance now will prevent future lost days on the water and disasters on the freeway.
What You Should Check
Frame: The trailer frame holds everything else together, so a thorough inspection is a good place to begin. Check every inch of the frame for buckling, cracks, or corrosion damage. Pay special attention to any welds, and the attachment points for fenders, bunks and rollers and the winch. If you find rusted areas, grind them down to bare metal with a brass wire brush and paint them with a corrosion-inhibiting primer. We have had good results with Pettit's silver 6980 Rustlok Steel Primer, even on a very old (1957) trailer.
U-bolts and coupler: Check the U-bolts and nuts which hold the axle or axles in place. Squirt a little WD-40 or corrosion inhibitor onto the threads, back the nuts off, and lubricate the threads. When in doubt, replace the U-bolt assembly (having an axle work loose on the freeway is very bad). Take a look at the trailer coupler, make sure the locking lever is in good condition, and lubricate with light oil. If the coupler is badly rusted, consider replacing it, which is cheap insurance against a disconnected trailer. Take care of any rust on the coupler with the wire brush and metal primer, and be sure that the coupler safety pin is present.
Winch: Next, inspect the winch. Now is a good time to consider a replacement, either manual or electric, if your current winch is undersized or in bad shape. Unroll the cable or strap, and check for chafe, broken wire strands, or corroded swage fittings. When in doubt get a new one. Remember that your winch is designed to launch and retrieve your boat, not to hold the boat on the trailer while cruising the Interstates. Trailer winches are not tie-downs, and you need a separate tie-down line attached from the bow eye to the trailer tongue or winch stand.
Bunks and rollers: The rollers and bunks on your trailer should be checked (possibly with the boat in the water or otherwise off the trailer). Take a look at the carpet on the bunks, which is simple to replace if worn. Lubricate the bunk pivot points with light oil, check the pivots for corrosion, grind out all rust and apply primer. Be sure the rollers spin freely on straight axles and are in good condition. If you decide to replace your rollers, we recommend the yellow polyurethane rollers, which last longer than the black rubber type, and do not leave marks on your hull.
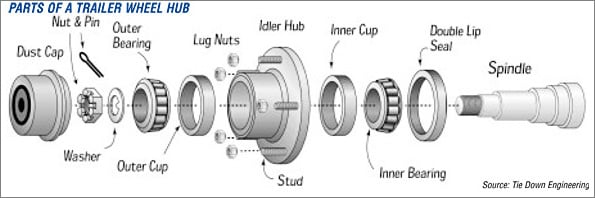
How to Repack or Replace Your Bearings
Hubs are the spinning assemblies to which the wheel attaches, consisting of the bearings, seal, flange, lug nuts, grease and dust cap. Poor maintenance, heavy use, and water intrusion cause hubs to wear out. Hub replacement kits run $60 to $100. We sell hub kits that are ready to install, with no disassembly of hubs required. An innovative solution is the Vortex Hub Kit, a completely sealed system that requires no maintenance for 100,000 miles.
Why bearings fail: Wheel bearings are tapered roller bearings that permit the trailer wheel to spin freely on the hub. They get hot while trailering, and then get plunged into cold water at the launch ramp. This rapid temperature change cools the air inside, producing a vacuum, which pulls water into the bearings. The water contaminates the grease, which eventually produces unseen corrosion, causing the bearings to seize up and fail. The best solution is to install bearing protectors, which maintain positive pressure inside the hub, displacing air from inside and keeping water out.
Another way to increase the life of your bearings is to replace your wheels with a larger size which reduces the rpm of the bearings. Many small trailers are equipped with tiny wheels (480 x 8 is a common size). When replacing a set of wheels, consider going up one size, if your fenders will allow the increase in diameter. Replacing the 480 x 8 wheels with 570 x 8 is a reasonable upgrade, for example.

How to replace them: This is a messy job, but replacing the bearings is much cheaper than replacing the hubs. It requires jacking up one side of the trailer, removing the dust cap which protects the bearings from road dirt, removing a large cotter pin, removing a large axle nut, and pulling apart the bearings and hub. After cleaning off the old grease and inspecting the bearings, you replace the seal and inner bearing, the hub and wheel, the outer bearing, and the nut. After adjustment of the axle nut (not too tight, so the bearings bind, but tight enough to remove side-to-side play), replace the cotter pin and dust cap. The video below shows how to determine what size bearings your trailer needs.
When on the road: Take a moment to check the wheel hubs each time you stop for gas. If the outside of the hub feels hotter than normal, the bearings should be inspected before resuming your journey. Removing a wheel at a gas station or rest area is much easier (and safer) than beside a freeway with cars whizzing past at 65 mph.
Carry spares: A spare set of bearings, a can of grease, some rags and some greaseless hand cleaner should be included in your travel supplies. Know whether your hubs have tapered or straight spindles and if you need one or two sizes of replacement bearings.
How to Check Tires for Wear and Pressure
Statistics show that most trailering problems happen because of flat tires or bearing problems, so inspecting your tires is critical. Inspect the treads for wear, and replace the tires if the wear bars are visible. Check the sidewalls for spiderweb cracks, which could be an early warning of a potential blowout. While checking the sidewalls, note some important information stamped there. Each tire has a Recommended Inflation Pressure, which is usually around 50 to 65psi (higher than a car's recommended 32 to 35psi). Also stamped on the tire is a Maximum Load Rating, the total amount of weight, including the boat, trailer and all gear, which the tire can carry. If your tire is rated at 600lb. and your trailer has a single axle, then 1200lb. is the rated total payload.
Use an accurate pressure gauge and inflate the tires to the proper level, and check your tire pressure before every trip. Check the pressure when the tires are cold because a few minutes of driving can raise the temperature and cause an inaccurate pressure reading. Do not rely on visual inspection; trailer tires have thicker sidewalls than automotive tires and can lose up to half their pressure without appearing to be under-inflated. Underinflated tires can overheat quickly, which can cause the plies in the tires to delaminate and lead to a blowout.
Make sure your spare is usable and well inflated and mounted securely with a spare tire carrier (you can mount the spare to the trailer frame with a U-bolt, but a real spare tire carrier is inexpensive). Do not mix radial and bias ply tires, and do not use a car tire as a spare, because trailer tires are more heavily built.
How to Inspect the Light System
Checking the lights requires connecting the tow vehicle to the trailer. Ask a helper to work the controls for the turn signals, taillights and brake lights. Before hooking up, take a look at every inch of the wiring harnesses, and secure any loose sections to the trailer's frame with wire ties or cable clamps. Inspect the wiring plug at the coupler end, clean the contacts with 400-grit sandpaper, and lubricate with dielectric grease or contact cleaner. Since new light systems are relatively inexpensive, it is smarter to replace everything than to spend time tracking down bad connections. If you do purchase new lights, consider LED products, which are more reliable, are submersible, last substantially longer, are brighter and illuminate instantly to give following drivers extra stopping time.
A common cause of light system failure is submersion when you launch your boat. Submerging the lights cause short circuits, corrosion of the connections and sockets, and thermal shock, where the hot bulbs come in contact with cold water.
Our most condensed advice to help make your lights more reliable:
- Replace incandescent lights with LED lights when you upgrade the system (by far the best solution)
- Mount your lights high enough so they stay dry, on boat guides or on a removable bar (if you have a small boat)
- If you ramp launch, use only submersible lights, which use gaskets or the “bell jar” principle to seal water out
- Avoid thermal shock by disconnecting trailer wiring harnesses before ramp launching
- Carry extra bulbs for all fixtures in the boat or tow vehicle tool kit
Other Articles on Trailering
Other Important Trailering Tips
Safety Chains: Connect the chains correctly by criss-crossing them below the trailer tongue so they will support the front of the trailer above the roadbed if it disconnects. The S-hooks should be attached to the tow vehicle's trailer hitch receiver with the open end of the hook facing up, so they will not bounce off.
Tongue weight: A trailer with improperly balanced weight may “fishtail,” swaying from side to side as it moves down the highway, creating excessive loads on both tow vehicle and trailer, increasing gas consumption or even causing an accident. Guard against fishtailing by making sure the weight load of your trailer is properly distributed. The weight on your trailer’s hitch ball (when the trailer tongue is parallel to the ground) should equal 7% to 12% of the weight of the loaded trailer. In most cases, you can use a bathroom scale to determine the weight on the trailer hitch ball. Check the information supplied by the trailer manufacturer to see if there is a specific percentage for your particular model. For example, if the gross weight of trailer, boat and gear is 1,500 pounds, the weight on the tongue should not be more than 180 pounds, nor less than 105 pounds. (Some auto manufacturers say that tongue weight should not exceed 200 pounds when using a weight-carrying hitch with full-size cars).
Trailer Hitch: Make sure your hitch is rated correctly for the trailer you tow. There are five weight classifications:
- Class 1: maximum trailer/boat/gear weight 2,000lb. with a tongue weight limit of 200lb; attached to bumper and two points on frame of vehicle.
- Class 2: maximum trailer weight 3,500lb. with a tongue weight of 300-350lb; attached to at least two points on vehicle frame.
- Class 3: maximum trailer weight 5,000lb. with 500lb. tongue weight; attached to at least four locations on vehicle frame.
- Class 4: maximum trailer weight 10,000lb. with 1,000-1,200lb. tongue weight; attached to at least four frame locations.
- Class 5: Maximum trailer weight 12,000lb. with 1,000-1,200lb. tongue weight; attached to at least four frame locations.
Hitch Balls are made in four diameters: 1 7/8" (up to 6,000lb.); 2" (up to 6,000lb.); 2 5/16" (up to 10,000lb.); 2 1/2" (for Class V hitches—up to 12,000lb.). Be sure that your hitch ball is the correct size for your trailer’s coupler, because a ball that is undersized will allow the trailer to bounce loose.
Tow vehicle: Make sure your tow vehicle is big and powerful enough for the boat, trailer and gear it needs to pull. While one of our friends tows his Ultimate 20 sailboat (boat and trailer about 1,800lb.) with a Toyota Matrix, that’s a dumb idea. Be realistic, and don’t let the tail wag the dog. A Chevy Suburban, Ford Econoline van or similar vehicle is a good choice for the 21 to 24 foot boat. Trying to tow with an undersized vehicle is dangerous, and likely to lead to overheating and drivetrain or brake failure.
Conclusion
A little preventative maintenance for your trailer makes the difference between long-distance fun and a roadside nightmare. Hidden faults are more likely if you don't use your boat frequently. The most common problems involve the wheel bearings and the tires, so take extra care with maintenance, check regularly and always carry spares. Don’t skimp on the quality of your lights, because they are essential safety gear. Light systems are inexpensive, so replace your old system if there are problems. Be sure your boat is well secured with proper tie-downs attached to the bow, stern and gunwales.
Trailering your boat can be simple and hassle-free if you follow these basic guidelines. Hit the road, and enjoy your next trailer boating adventure.