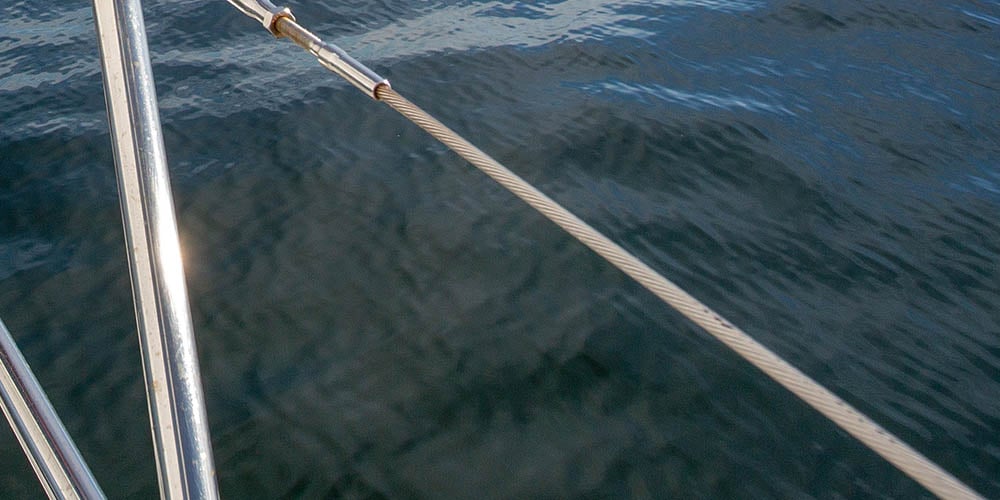
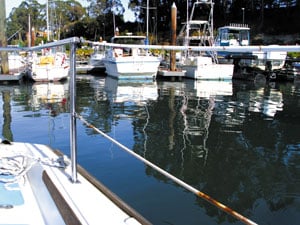
Lifelines with this much rust on the outer jacket of the vinyl-coated wire are a man-overboard accident waiting to happen.
Lifeline Inspection Tips
Lifelines form a safety perimeter around your boat and should be inspected on an annual basis. Preventive maintenance is not just a prudent boating practice, but in the case of lifeline systems it could be a lifesaver. Here are a few tips to review for your annual lifeline checkup:
- Tape all opening fittings (pelican hooks) so that they cannot open accidentally. Some hooks can accept a cotter pin to keep the bill from opening up.
- Make sure that adjustable fittings are secured by their lock nuts. If secured with split rings, make sure the rings are intact and taped off with rigging tape.
- Inspect all swages to make sure there is no fatigue, cracking or corrosion damage at the wire.
- Check stanchion bases for cracks, damage and movement.
- Ensure that there is good alignment between the wire and the load, and use a toggle jaw or other universal fitting to correct misalignment.
- Lifelines can only be as strong as their weakest link, which could be the stanchions’ attachments to the hull (bedded and thru-bolted), loose lifeline terminals, or the small diameter stainless wire, which often is used as an attachment to the pulpit or pushpit.
Proper maintenance and strong stanchions are necessary precautions to make sure the system withstands the impact of a falling crewmember in a worst-case scenario.
What kind of lifeline is right for your boat?
Vinyl-coated 7 x 7 stainless wire: low stretch, semi-flexible, and attractive. For years, 3/16" diameter white vinyl coated wire (5/16" OD) has been the norm. It has a traditional look and a smooth feel when you lean against or grab it. Although vinyl coated wire has been the standard for many years, vinyl coating can discolor, particularly in high UV areas, and because of the coating the wire underneath is difficult to inspect.

Detail of the lifeline from the photo above. Don’t even think of leaning against this dangerously rusted wire!
Uncoated 1 x 19 wire: 3/16" diameter uncoated wire is becoming more popular and is now required on offshore racing boats. Although a little harder on the hands and body when you lean against it due to its smaller overall diameter and rougher surface, it is easier to inspect for corrosion.
High-tech rope lifelines made from Dyneema line such as Samson AmSteel or New England Ropes' STS-WR2 are a third option. Although it’s lightweight, UV-resistant and extremely strong (7,400lb. tensile strength vs. 3,700lb. for 3/16" vinyl coated wire), Dyneema is not as protected against chafe as stainless steel wire but is very easy on the hands and body.
The two ways to install a lifeline fitting onto a lifeline wire are swaging and hand crimping. Swaging is normally performed by a professional rigger or mast builder, because it requires a large swage tool. Hand crimping is accomplished with a stop sleeve tool, often called a "Nicopress" tool.
Hand-crimped terminals can be owner-installed, saving the cost of hiring a professional rigger. The barrels on the hand-crimped terminals do end up looking a little lumpy, but they are strong and dependable when crimped with the right tool.
If you are a do-it-yourself type person who can splice line, you can easily make up new lifelines using Dyneema line and CS Johnson Splice Line Fittings. West Marine carries a full line of Johnson Marine Splice Line fittings for rope, hand crimp fittings for making your own wire lifelines, the proper tool for crimping the hand crimp fittings as well as both coated and uncoated wire and Dyneema line.
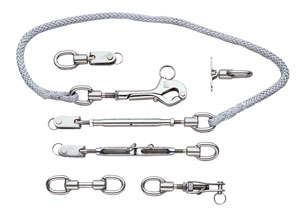
Splice Line fittings allow you to make Dyneema lifelines with stainless hardware.
What size wire should you use?
Larger wire is safer, but it is also heavier. Lifeline wire has traditionally been available in 1/8" and 3/16" wire diameters (actual wire core measurement; the vinyl coating increases the diameter to 7/32" and 5/16" respectively). While larger wire is nicer to hang on to, and is stronger (3,700 lbs. vs. 1,760 lbs.), it is also heavy and oversized for small sailboats. For this reason, many boats use the smaller size.
Sizing Lifeline Wire
Racing sailboats should follow the World Sailing Offshore Special Regulations 3.14.6, which are summarized as follows: Up to 28' LOA—1/8" wire; 28-43' LOA—5/32" wire; 43' LOA and up—3/16" wire.
These sizes are minimums; you can use larger sizes. 5/32" wire is not common in the US, but West Marine Rigging offers it on a custom basis since each terminal has to be built from separate component parts. Ask for a quote if you are interested in 5/32" wire lifelines. Cruisers are not affected by racing rules so they may elect to go with 3/16" on the upper and 1/8" on the lower lifelines.
NOTE: Lifelines require very specific measurements to ensure proper fit. It is important to know where to measure to, since different terminals are measured differently. This is a good reason to just send your lifelines to West Marine Rigging for an exact reproduction of the replacement. This project can be completed while the boat is hauled.
Replacing Your Lifelines
If you determine that your lifelines need replacement and you want to use either the traditional vinyl coated wire or uncoated 1 x 19, the easiest option is to drop your old lifelines off at a West Marine store, or send them to a West Marine Rigging Shop and have the professionals at West Marine Rigging duplicate them. (Normally you can reuse your turnbuckles and pelican hooks, or you may want to upgrade to the newer Johnson Marine “over center” style pelican hooks.) Another option is to complete the Lifeline Measurement Form and fax or mail it to the West Marine Rigging shop.